Simplified TCS Tax Payment in Tally Prime: A Step-by-Step Tutorial
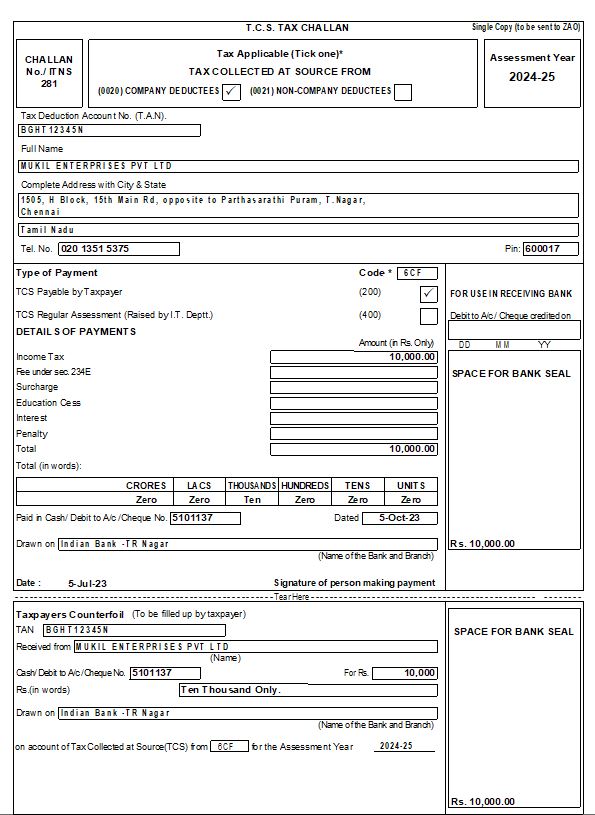
05th July 2023 Mukil Enterprises Pvt. Ltd., have collected TCS Amount towards Multiple Nature of Goods in May-June 2023. The tax is paid to the government.
| Return Period | Incomes Received and Collected Month | Monthly Tax Liability Amount (₹) | Due Date for Payment | Actual Payment Date | Interest Rate (p.m) | Form Type |
|---|---|---|---|---|---|---|
| 4th Quarter | May 23 | 10,950 | 7th June 23 | 5th July 23 | 1.5% | Form 27EQ |
| June 23 | 10,071 | 7th July 23 | 5th July |
| Filing Due Dates for Form 27EQ | |
|---|---|
| Periodicity (Quarter) | Government and Non-Government Entities |
| April to June | 15th July |
| July to September | 15th October |
| October to December | 15th January |
| January to March | 15th May |
05th July 2023 Mukil Enterprises Pvt. Ltd., have collected TCS Amount towards Multiple Nature of Goods in May-June 2023. The tax is paid to the government.
- Navigate to Payment Voucher Entry:
- Open Tally Prime software.
- Go to the "Vouchers" section.
- Choose "Payment" as the voucher type.
- Autofill Options:
- Since you want to autofill the details for TCS payment, select the option for "Autofill" available in the payment voucher.
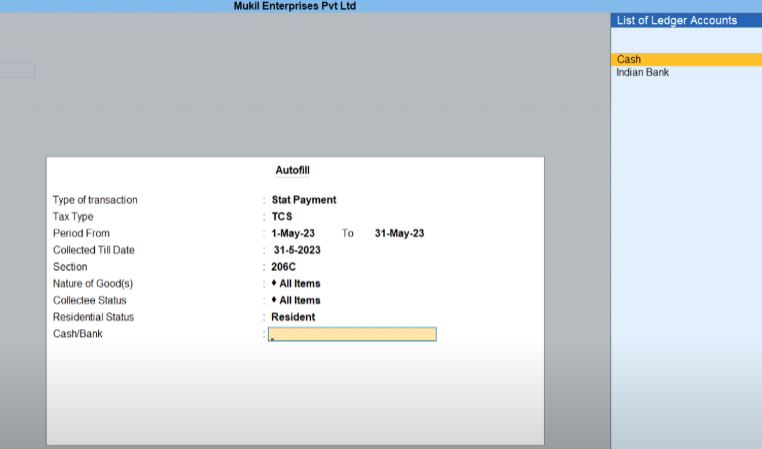
- Enter Transaction Details:
- Type of Transaction: Specify as "Stat Payment" to indicate a statutory payment.
- Tax Type: Select "TCS" to specify that it's a Tax Collected at Source payment.
- Period From: Enter the starting date of the period for which the TCS payment is applicable, in this case, 1st May 2023.
- Period Till: Enter the ending date of the period, which is 31st May 2023.
- Collected Till Date: Specify the last date until which TCS was collected, which is 31st May 2023.
- Section: Enter the applicable section, which is "206C" for TCS.
- Nature of Good(s): Specify "All Item" to indicate that TCS applies to all items.
- Collectee Status: Choose "All Item" to apply TCS to all types of collectees.
- Residential Status: Select "Resident" to specify that the collectees are residents.
- Cash/Bank: Choose "Indian Bank" to specify the mode of payment.
- Save and Verify:
- Save the payment voucher after ensuring that all the details are correctly entered and autofilled.
- Navigate to Payment Voucher Entry:
- Open Tally Prime software.
- Go to the "Accounting Vouchers" section.
- Choose "Payment" as the voucher type.
- Autofill Options:
- Since you want to autofill the details for TCS payment, select the option for "Autofill" available in the payment voucher.
- Enter Transaction Details:
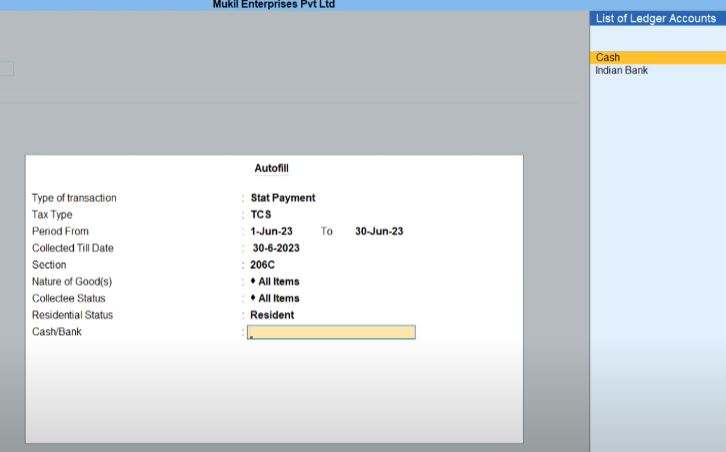
- Type of Transaction: Specify as "Stat Payment" to indicate a statutory payment.
- Tax Type: Select "TCS" to specify that it's a Tax Collected at Source payment.
- Period From: Enter the starting date of the period for which the TCS payment is applicable, in this case, 1st June 2023.
- Period Till: Enter the ending date of the period, which is 30th June 2023.
- Collected Till Date: Specify the last date until which TCS was collected, which is 30th June 2023.
- Section: Enter the applicable section, which is "206C" for TCS.
- Nature of Good(s): Specify "All Item" to indicate that TCS applies to all items.
- Collectee Status: Choose "All Item" to apply TCS to all types of collectees.
- Residential Status: Select "Resident" to specify that the collectees are residents.
- Cash/Bank: Choose "Indian Bank" to specify the mode of payment.
- Save and Verify:
- Save the payment voucher after ensuring that all the details are correctly entered and autofilled.
Print Invoice
- Open Tally Prime:
- Launch Tally Prime software on your computer.
- Navigate to Voucher Entry:
- Go to the " Vouchers" section.
- Select Sales Voucher:
- Choose the sales voucher for which you want to print the invoice.
- Verify and Finalize:
- Ensure that all the details in the sales voucher are accurate and final before proceeding to print the invoice.
- Print Invoice:
- Once you are ready to print the invoice, locate the print option. This is typically found in the menu bar or can be accessed using a keyboard shortcut (such as Ctrl+P or Alt+P).
- Adjust Printer Settings:
- Before printing, ensure that your printer is connected and turned on. Adjust any necessary settings such as paper size, orientation, and number of copies.
- Preview and Print:
- Tally Prime may provide a preview of the invoice before printing. Review the preview to ensure everything appears as expected.
- Once you are satisfied with the preview, click the print button to initiate printing.
- Save or Send:
- After printing, you may choose to save a digital copy of the invoice or send it directly to the recipient via email or other means, depending on your requirements.
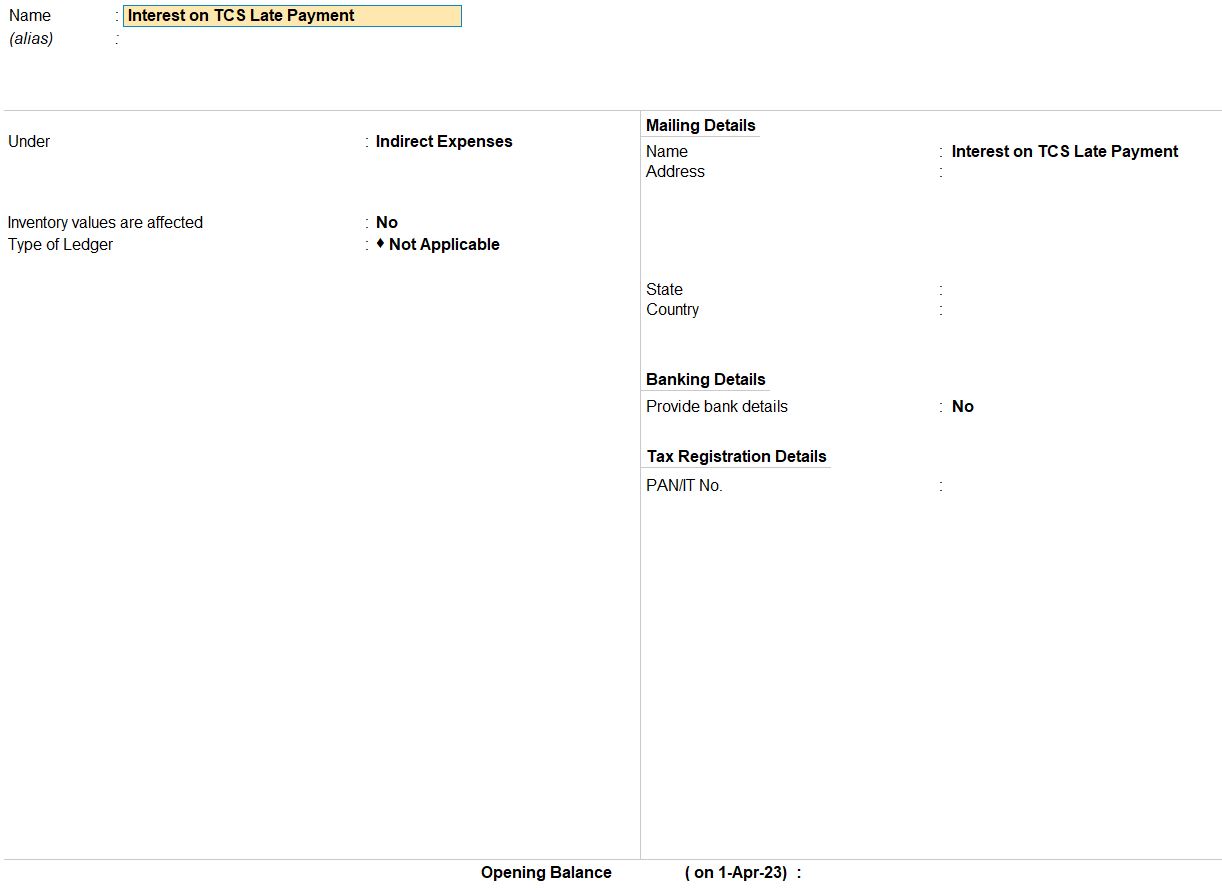
Interest on TCS Late Payment
- Navigate to Ledger Creation:
- Open Tally Prime software.
- Go to the "Accounting Vouchers" section.
- Create New Ledger:
- From the menu, select "Ledger."
- Choose "Create" to add a new ledger.
- Enter Ledger Details:
- Name: Enter "Interest on TCS Late Payment" as the name of the ledger.
- Under: Select "Indirect Expenses" to categorize it correctly.
- Save Changes:
- After entering all the necessary details, save the ledger.
- Navigate to Payment Voucher Entry:
- Open Tally Prime software.
- Go to the "Accounting Vouchers" section.
- Enter Date and Voucher Details:
- Set the voucher date as per the transaction date.
- Choose "Payment" as the voucher type.
- Enter Transaction Details:
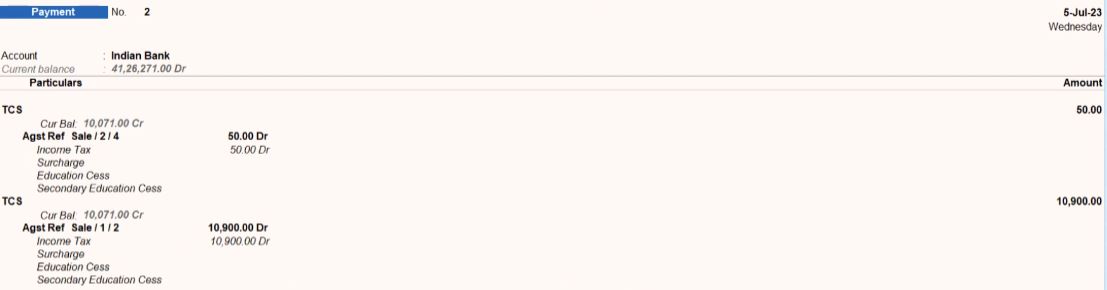
- Account: Indian Bank under.
- Particular: TCS (Tax Collected at Source) with an amount of ₹50.
- Particular: TCS with an amount of ₹10,900.
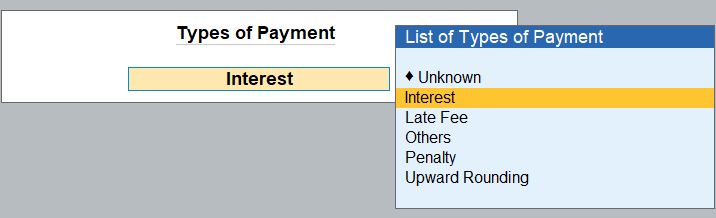
- Particular: Interest on TCS Late Payment under Types of Payment “Interest” with an amount of ₹329.
- Save and Verify:
- Save the payment voucher after ensuring that all the details are correctly entered.
- Once you are satisfied with the preview, click the print button to initiate printing.

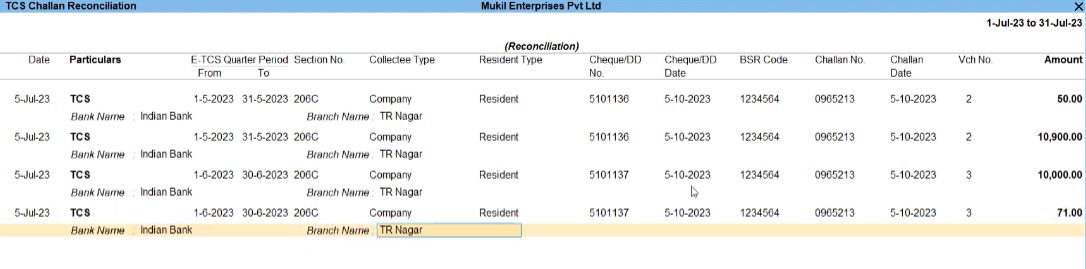
Reports Challan Reconciliation
- Open Tally Prime
- Launch the Tally Prime software on your computer.
- Navigate TCS Reports:
- From the Gateway of Tally, go to "Display" (located on the left-hand side).
- Then, select "More Reports" from the options.
- Access TCS Reports:
- Under "More Reports," choose "TCS Reports."
- Select Challan Reconciliation:
- From the TCS Reports menu, select "Challan Reconciliation."
- Enter Challan Details:
- In the Challan Reconciliation screen, enter the following details:
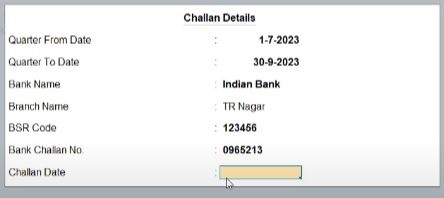
- Quarter From Date: Specify the starting date of the quarter, which is 1st July 2023.
- Quarter To Date: Specify the ending date of the quarter, which is 30th September 2023.
- Bank Name: Enter the name of the bank where the TCS was deposited, which is Indian Bank.
- Branch Name: Specify the branch name, which is TR Nagar.
- BSR Code: Enter the BSR (Basic Statistical Return) Code for the bank branch, if applicable.
- Bank Challan No: Input the bank challan number related to the TCS deposit, which is 0955213.
- Challan Date: Enter the date of the challan, which is 5th October 2023.
- View Challan Reconciliation Reports:
- After entering the necessary details, you can view the Challan Reconciliation report, which provides information about TCS deposits and reconciles them with the relevant challan details.
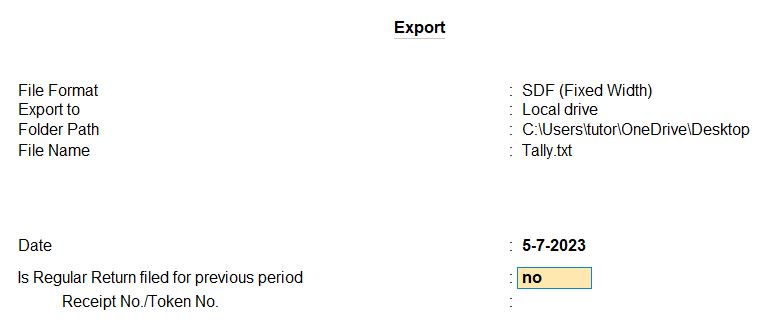
Export Reports
- Open Tally Prime
- Launch Tally Prime software.
- Navigate to TCS Reports:
- Go to Gateway of Tally
- Select "Display More Reports."
- Choose "TCS Reports."
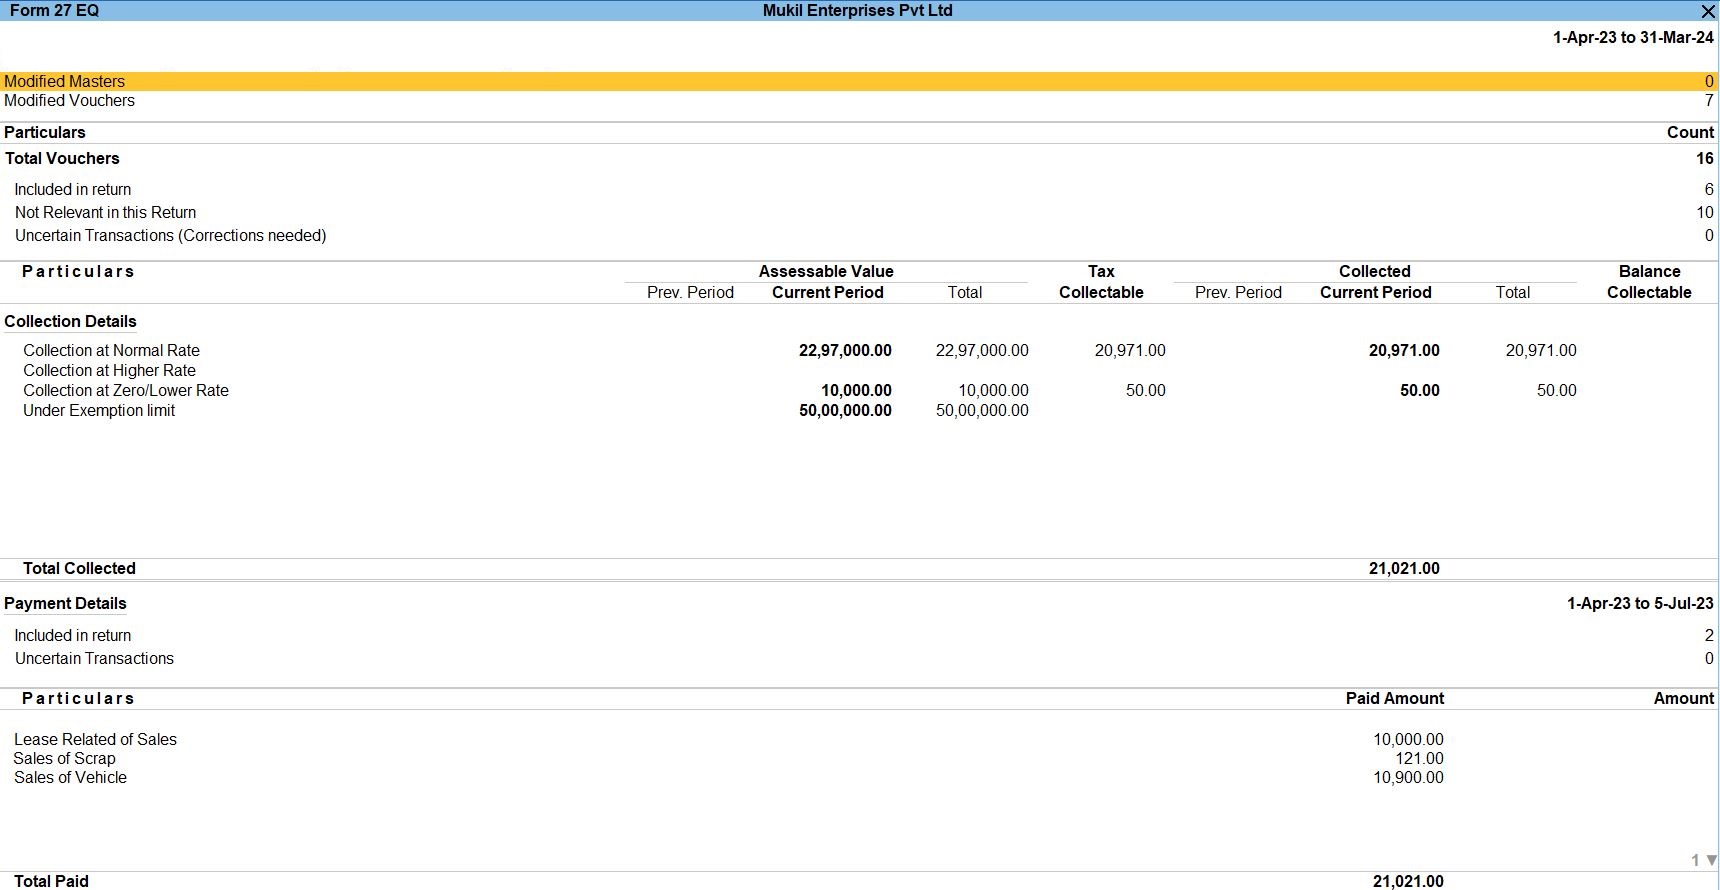
- Select Form 27 EQ:
- Click on "From 27 EQ" to generate the report.
- Export the Report:
- Once the report is displayed, press Alt+E to export.
- Choose "E Return" from the export options.
- Specify Export Settings:
- Select "SDF (Fixed Width)" as the file format.
- Choose "Export to: Local Drive."
- Specify the folder path where you want to save the exported file, for example, "C:\Users\tutor\OneDrive\Desktop."
- Enter the file name as "Tally.txt."
- Additional Information:
- Enter the date as 05-10-2023.
- Specify whether a regular return was filed for the previous period (Y for Yes or N for No).
- Enter the receipt number or token number if applicable.
- Complete Export:
- Once all the details are entered, press Enter to export the report.
Tally Prime
Learn All in Tamil © Designed & Developed By Tutor Joes | Privacy Policy | Terms & Conditions