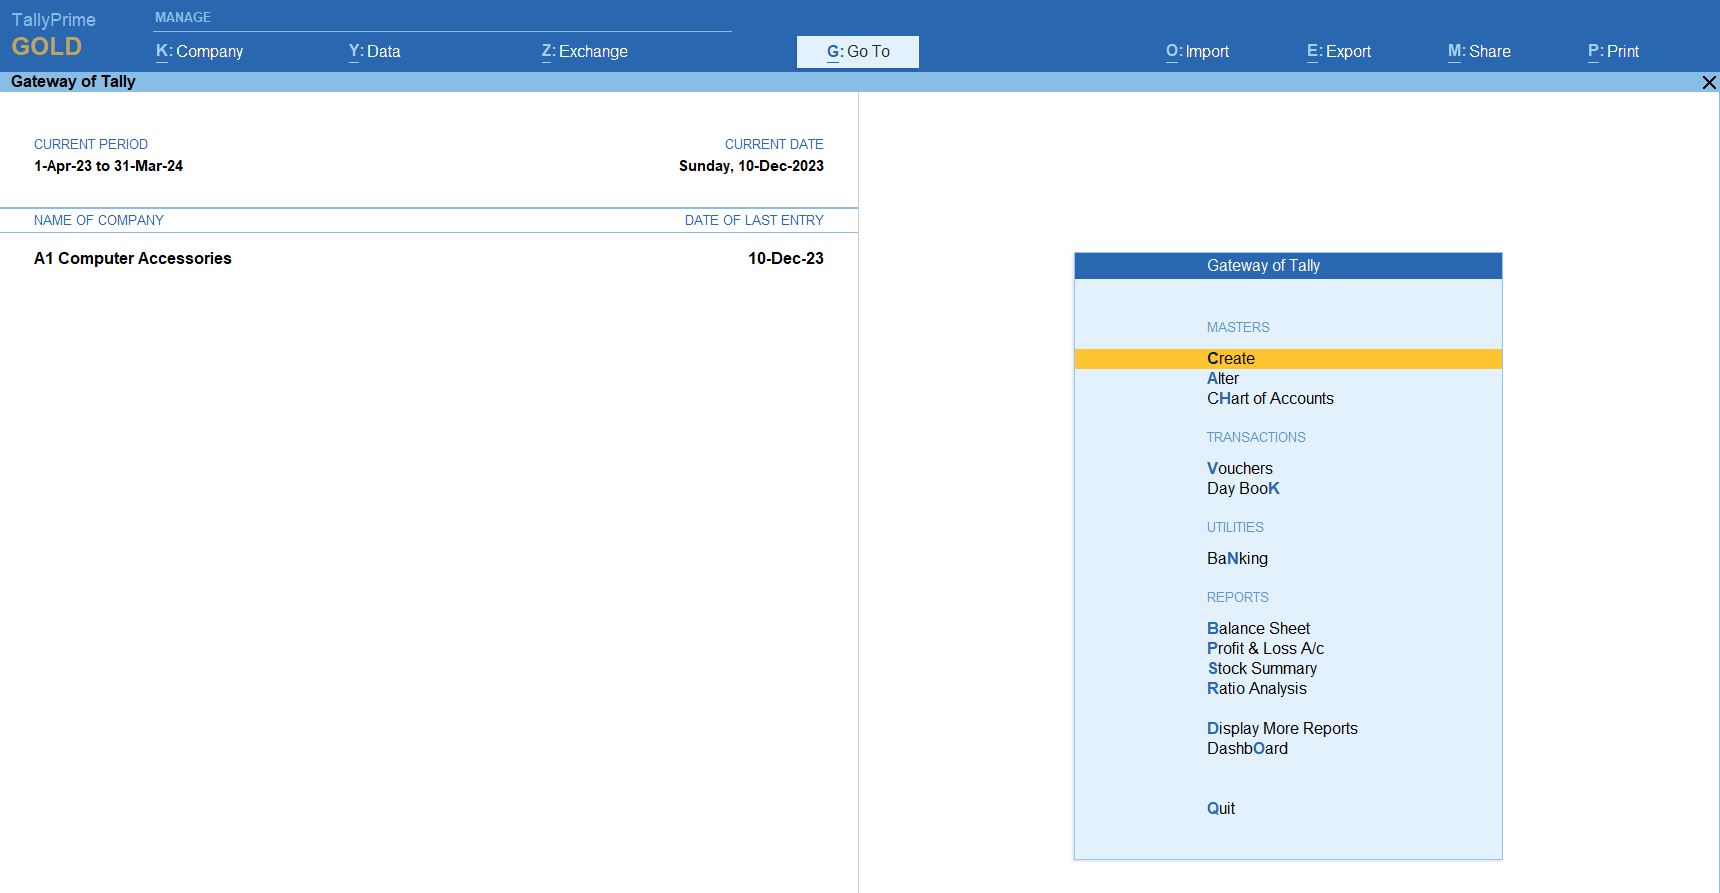
Efficient Data Management Strategies in Tally Prime
Date Management
- Setting the Current Date:
- When you open Tally Prime, it automatically sets the current date based on your system's date.
- You can manually change the current date by pressing the shortcut key F2 or by navigating to the date field and entering the desired date.
- Using Specific Dates in Transactions:
- When entering transactions, such as sales, purchases, receipts, payments, etc., you can specify the transaction date.
- The transaction date reflects the date on which the transaction occurred and affects the financial statement’s accuracy.
- Altering Transactions Dates:
- You can alter transaction dates if you need to correct errors or backdate transactions for any reason.
- However, it's essential to maintain consistency and ensure that backdated transactions are properly documented and authorized.
- Viewing Reports for Specific Date Ranges:
- Tally Prime allows you to generate financial reports for specific date ranges, such as daily, monthly, quarterly, or annually.
- You can customize reports to view financial performance over specific periods, aiding in analysis and decision-making.
- Period Locking:
- To prevent accidental changes to financial data, Tally Prime offers a period locking feature.
- Administrators can lock specific accounting periods to prevent unauthorized modifications to transactions within those periods.
- Adjusting Financial Years:
- Tally Prime allows you to define and manage financial years according to your organization's fiscal calendar.
- You can change financial year settings to align with your organization's reporting requirements.
- Advance Date Management:
- Tally Prime provides options for advanced date management, such as handling leap years and changing the base year for calendars.
- These features ensure that Tally Prime can adapt to various date-related scenarios and maintain accurate financial records.
Backup
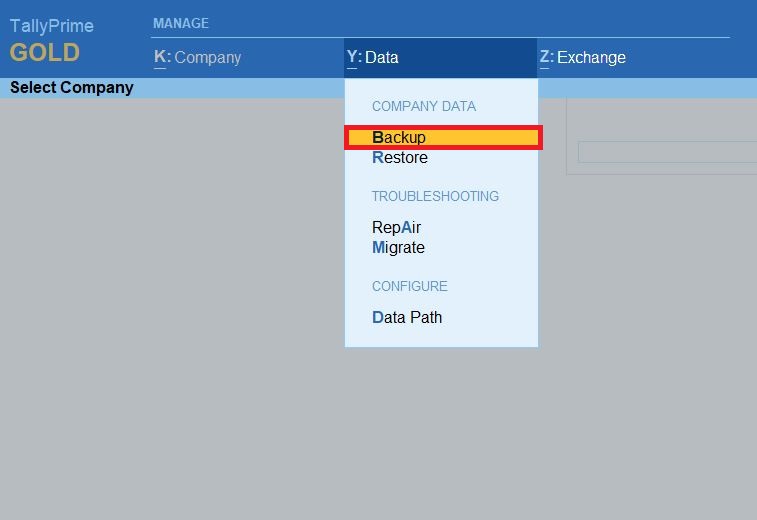
- Data Menu:
- The "Data" menu in Tally Prime is where you can find options related to managing company data, including backup, restore, and other data-related tasks.
- Company Data:
- Under the "Company Data" submenu, you'll find options for managing data specific to individual companies created in Tally Prime.
- Backup:
- The "Backup" option allows you to create a backup of your company data files.
- Backup is essential for safeguarding your data against loss due to system failures, data corruption, or accidental deletions.
- Regular backups are recommended to ensure data integrity and facilitate data recovery in case of emergencies.
- Procedure for Backup
- To create a backup in Tally Prime, you would typically follow these steps:
- Navigate to the "Data" menu.
- Select "Company Data."
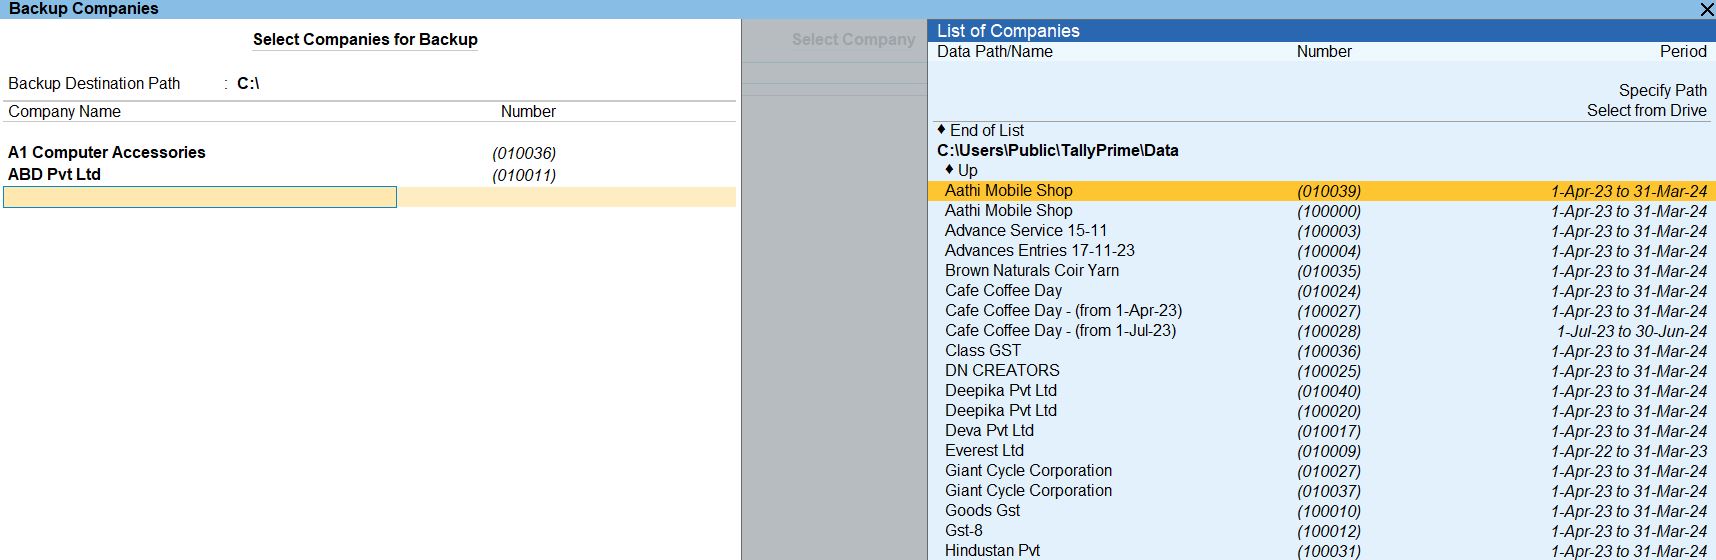
- Choose the "Backup" option.
- Tally Prime will prompt you to specify the destination where you want to save the backup file.
- You can choose an external storage device, cloud storage, or any other location on your system.
- Once you select the destination, Tally Prime will create a backup of your company data and save it to the specified location.
- Backup Frequency:
- It's essential to establish a regular backup schedule to ensure that your data is consistently backed up.
- Depending on your organization's needs and data sensitivity, you may choose to perform backups daily, weekly, or at other intervals.
- Backup File Format:
- Tally Prime typically saves backup files in its proprietary format, which can be restored using Tally Prime's restore functionality.
- Backup files are often compressed to reduce storage space and facilitate easier transfer and storage.
- Backup Retention:
- Consider establishing a backup retention policy that determines how long backup files are kept.
- Regularly review and update your backup retention policy to ensure that you retain backups for an appropriate duration based on your organization's needs and compliance requirements.
Restore
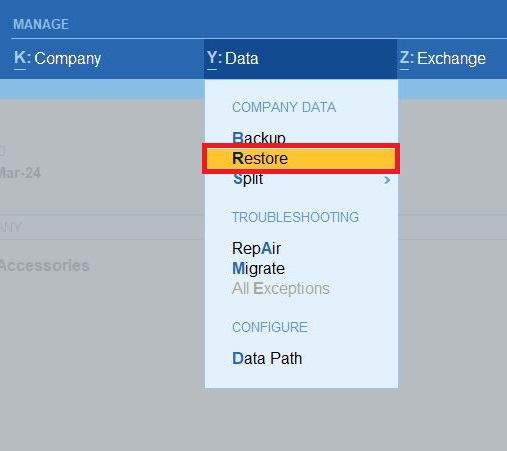
- Data Menu
- The "Data" menu in Tally Prime provides various options for managing company data, including backup, restore, and other data-related tasks.
- Company Data:
- Under the "Company Data" submenu, you'll find options for managing data specific to individual companies created in Tally Prime.
- Restore
- The "Restore" option allows you to restore company data from a previously created backup file.
- This feature is useful for recovering data in case of accidental deletion, data corruption, or system failures.
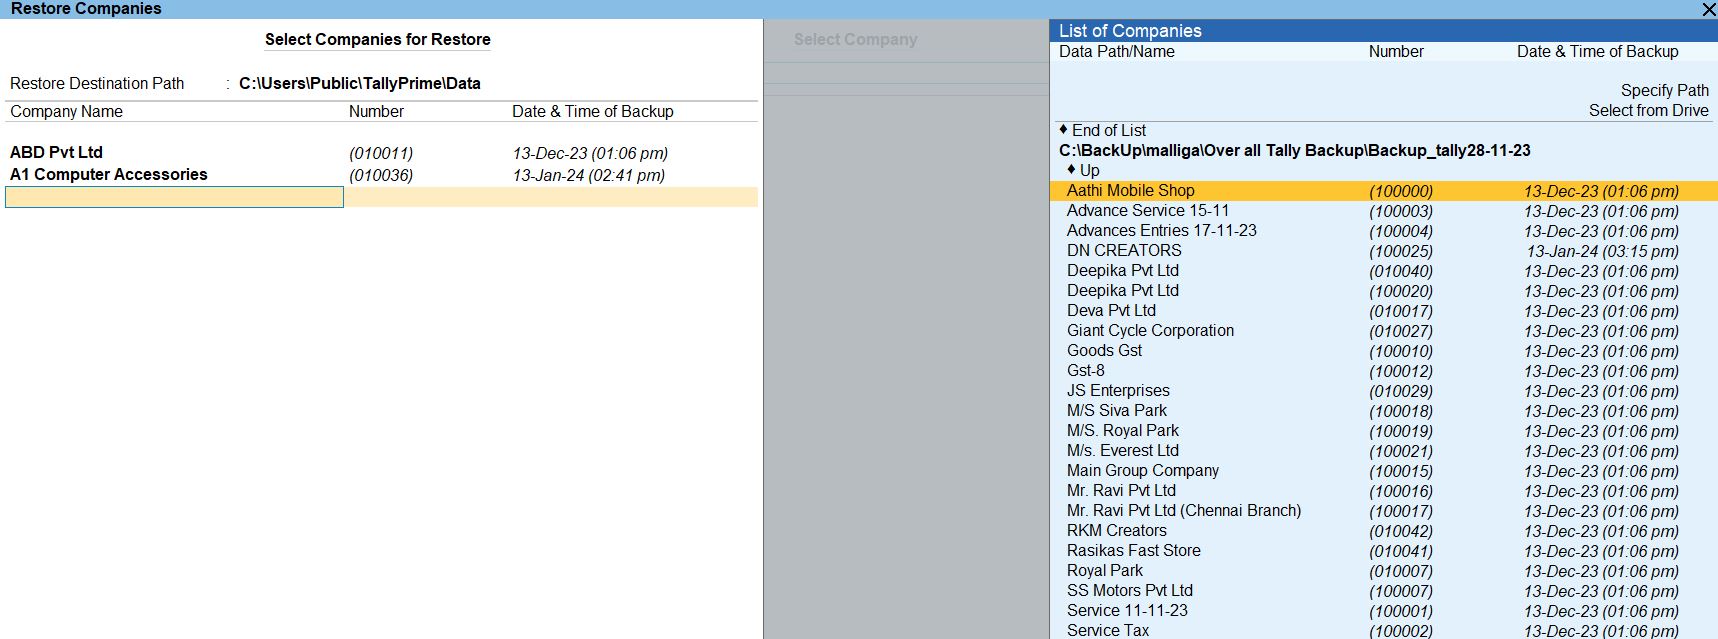
- Procedure for Restore:
- To restore company data in Tally Prime, follow these steps:
- Navigate to the "Data" menu.
- Select "Company Data."
- Choose the "Restore" option.
- Tally Prime will prompt you to specify the location of the backup file you want to restore.
- Browse to the location where the backup file is saved and select it.
- Once you select the backup file, Tally Prime will initiate the restoration process.
- During the restoration process, Tally Prime will overwrite the existing company data with the data from the backup file.
- After the restoration is complete, you'll receive a confirmation message indicating that the process was successful.
- Backup Compatibility:
- Ensure that the backup file you're restoring is compatible with the version of Tally Prime you're using.
- Attempting to restore a backup file created in a different version of Tally Prime may result in compatibility issues or data loss.
- Verification:
- After restoring company data, it's essential to verify that the restoration was successful.
- Review the restored data to ensure that all transactions, ledgers, and other company information are intact and accurate.
- Data Integrity:
- To maintain data integrity, it's crucial to perform regular backups and ensure that backup files are stored securely.
- Regularly test the restore process to verify that you can successfully recover data when needed.
Shut Company
- Shut Company Functionality:
- The "Shut Company" function is used to close the currently open company's data and return to the company selection screen in Tally Prime.
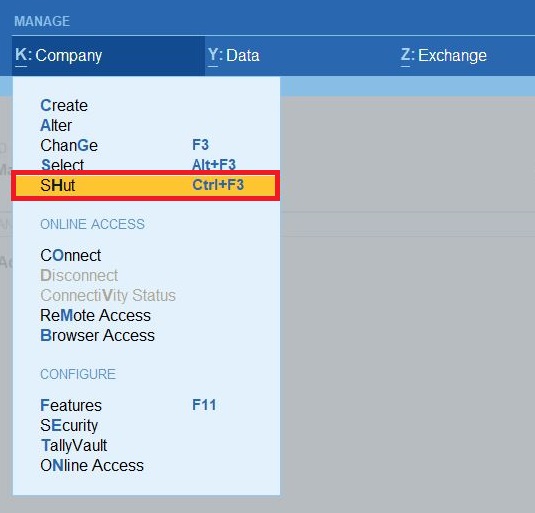
- Accessing Shut Company:
- You can access the "Shut Company" feature through the main menu or by using a shortcut key.
- To access it through the main menu:
- Go to the main menu at the top of the Tally Prime window.
- Navigate to the "Company" menu.
- Under the "Company" menu, you'll find the "Shut Company" option.
- Click on "Shut Company" to close the current company.
- Shortcut Key:
- The shortcut key to quickly access the "Shut Company" feature is Alt + F1.
- Pressing the Alt and F1 keys simultaneously will immediately initiate the process of shutting down the currently open company.
- Purpose:
- Shutting down a company in Tally Prime is useful when you want to close the data of one company and switch to another company without exiting Tally Prime.
- It allows users to work with multiple companies efficiently within the same Tally Prime session.
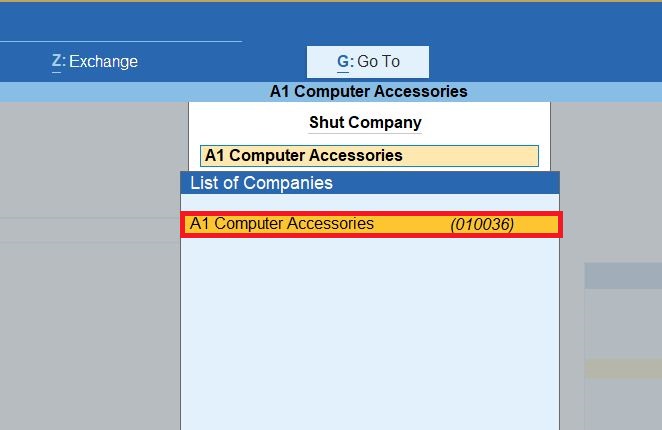
- Closing Procedure:
- When you select the "Shut Company" option or use the Alt + F1 shortcut key, Tally Prime will close the currently open company's data.
- You'll be taken back to the company selection screen, where you can choose another company to work with or exit Tally Prime if needed.
- Precautions
- Before shutting down a company, ensure that all transactions are saved and no unsaved data is left.
- Make sure that all users have completed their work and exited from the company to prevent data loss or inconsistencies.
- User Convenience:
- The "Shut Company" feature provides convenience to users who frequently work with multiple companies in Tally Prime by allowing them to switch between companies seamlessly.
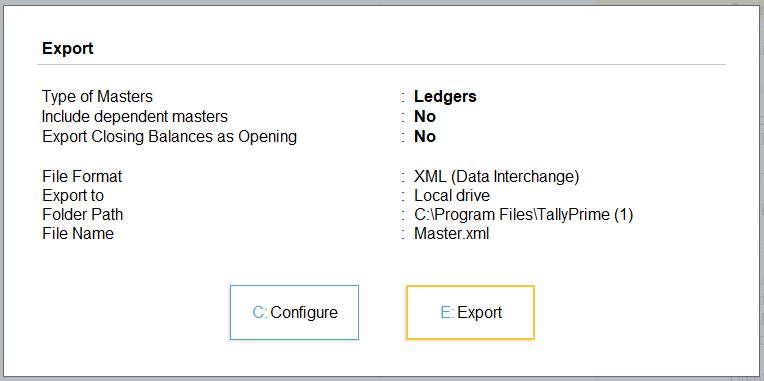
Export Masters
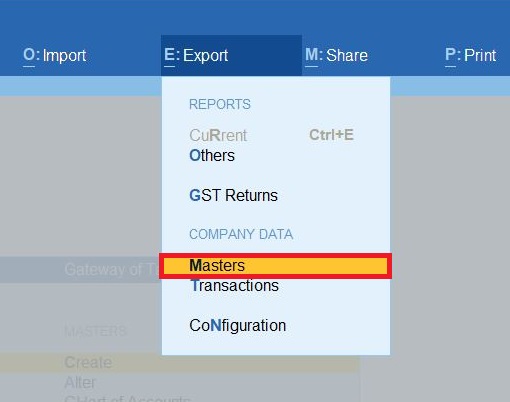
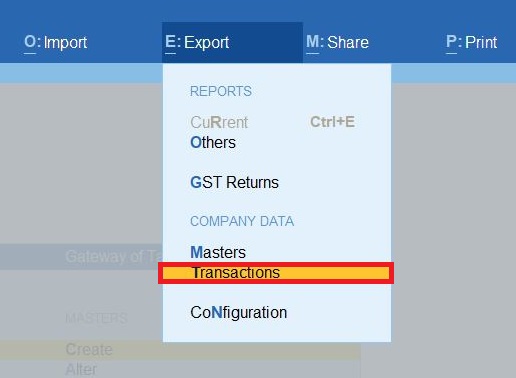
- Accessing Export Menu:
- Press the "Alt" key on your keyboard and while holding it down, press the "E" key. This will open the export menu in Tally Prime.
- Export Masters Option:
- Within the export menu, navigate to the option labeled "Masters." This option is specifically designed for exporting master data from Tally Prime.
- Selecting Masters:
- Once you have chosen the "Masters" option, you will likely see a list of available masters that can be exported. These masters may include items, ledgers, groups, vouchers, and more, depending on your configuration and data.
- Use the arrow keys or mouse to select the specific master or masters that you want to export. You can select multiple masters if needed.
- Export Format:
- After selecting the masters, Tally Prime will prompt you to choose the export format. You may have options such as Excel (XLS/XLSX), PDF, CSV, or other file formats, depending on your Tally Prime configuration and installed utilities.
- Destination Selection:
- Once you've chosen the export format, Tally Prime may prompt you to specify the destination where the exported file will be saved. This could be a local drive, network location, or any other destination accessible from your system.
- Export Process:
- After confirming the export settings, Tally Prime will initiate the export process. It will extract the selected master data from your Tally company and save it into the specified file format at the chosen destination.
- Completion:
- Once the export process is complete, Tally Prime may provide a confirmation message indicating that the export was successful. You can then access the exported file from the specified destination and use it as needed.
- Purpose:
- Exporting masters from Tally Prime allows users to create backups, share data with others, analyze information in external tools like Microsoft Excel, or migrate data to other systems or software platforms.
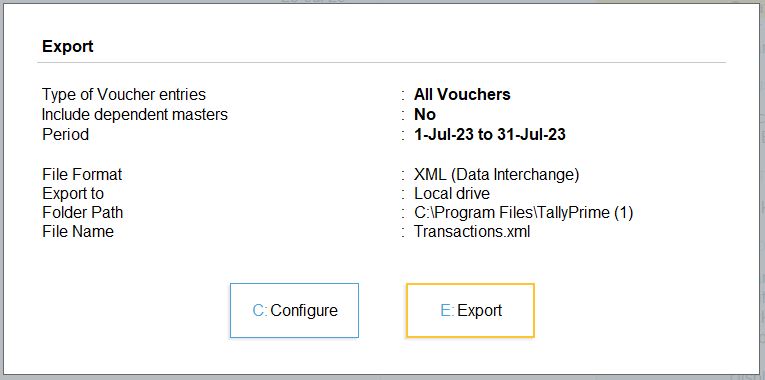
Export Transactions
- Accessing Export Menu:
- Press the "Alt" key on your keyboard and while holding it down, press the "E" key. This will open the export menu in Tally Prime.
- Export Transactions Option:
- Within the export menu, navigate to the option labeled "Transactions." This option is specifically designed for exporting transaction data from Tally Prime.
- Selecting Transactions:
- Once you have chosen the "Transactions" option, you will likely see a list of available transaction types that can be exported. These transactions may include sales invoices, purchase invoices, payments, receipts, journal entries, and more, depending on your Tally Prime configuration and data.
- Use the arrow keys or mouse to select the specific transaction or transactions that you want to export. You can select multiple transactions if needed.
- Choosing Transactions to Export:
- Use the arrow keys or mouse to select the specific transaction or transactions that you want to export. You can select multiple transactions if needed.
- Export Format:
- After selecting the transactions, Tally Prime will prompt you to choose the export format. You may have options such as Excel (XLS/XLSX), PDF, CSV, or other file formats, depending on your Tally Prime configuration and installed utilities.
- Destination Selection:
- Once you've chosen the export format, Tally Prime may prompt you to specify the destination where the exported file will be saved. This could be a local drive, network location, or any other destination accessible from your system.
- Export Process:
- After confirming the export settings, Tally Prime will initiate the export process. It will extract the selected transaction data from your Tally company and save it into the specified file format at the chosen destination.
- Completion:
- Once the export process is complete, Tally Prime may provide a confirmation message indicating that the export was successful. You can then access the exported file from the specified destination and use it as needed.
- Purpose:
- Exporting transactions from Tally Prime allows users to create backups, share data with others, analyze information in external tools like Microsoft Excel, or migrate data to other systems or software platforms.
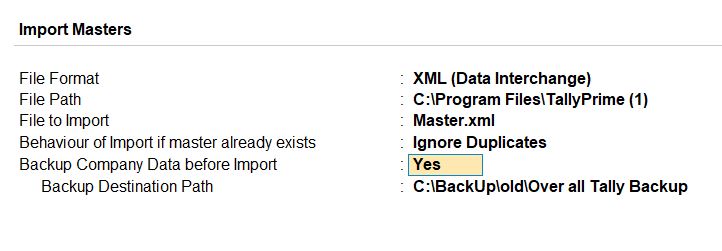
Import Masters
- Prepare the Data: First, ensure that your data is properly formatted in a supported file format such as Excel (.xls or .xlsx) or CSV (Comma-Separated Values).
- Access Import Masters: To access the "Import Masters" feature, follow these steps:
- Go to Gateway of Tally.
- Navigate to the "Import Data" menu.
- Under "Import Data," select "Masters."
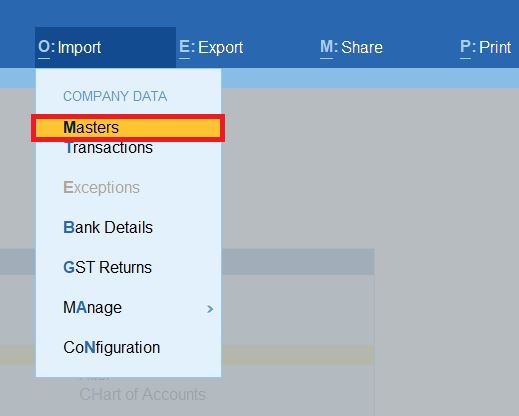
- Select Master Type: Choose the type of master data you want to import. This could include ledger masters, stock item masters, party masters, etc.
- Browse for File: Click on the "Browse" button to locate the file containing the master data you want to import. Select the appropriate file from your system.
- Map Fields: Tally Prime will prompt you to map the fields in your import file with the corresponding fields in Tally's master creation screen. Ensure that the fields are mapped correctly to avoid errors during import.
- Validate Data: After mapping the fields, Tally Prime provides an option to validate the data. This step checks for any errors or inconsistencies in the data before importing it into Tally.
- Initiate Import: Once the data is validated, proceed to initiate the import process. Tally Prime will import the master data from the selected file into the respective master’s module.
- Review Imported Data: After the import process is complete, review the imported data in Tally to ensure that all records have been imported accurately.
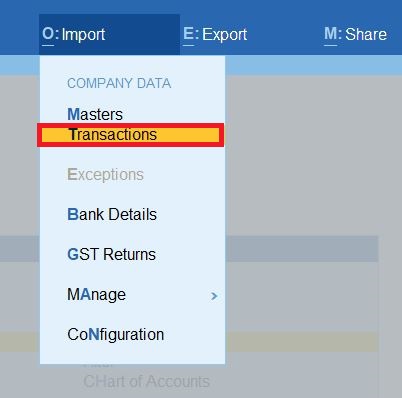
Import Transactions
- Prepare your data: Make sure your data is in a compatible format for import into Tally Prime. Tally supports various formats such as Excel (.xls, .xlsx), CSV (Comma Separated Values), and XML.
- Access the Import option: Open Tally Prime and navigate to the section where you want to import transactions, such as vouchers or masters.
- Press Alt + O: This keyboard shortcut will activate the import functionality within Tally Prime.
- Select the appropriate file: A file browser window will appear. Navigate to the location where your data file is stored and select it.
- Map fields (if required): Depending on the format of your data file and the configuration of Tally Prime, you may need to map the fields in your data file to the corresponding fields in Tally Prime. This step ensures that the data is imported correctly and in the right format.
- Confirm and import: Once you've mapped the fields (if necessary), confirm the import action. Tally Prime will then process the data from your file and import the transactions into the designated section.
- Review imported transactions: After the import process is complete, review the imported transactions to ensure accuracy and completeness. Make any necessary adjustments or corrections if required.
- Save your work: Once you're satisfied with the imported transactions, save your work in Tally Prime to retain the changes.
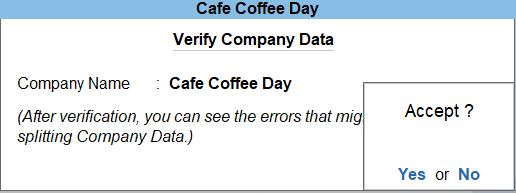
Split Verify Data
- Data Verification: When you initiate the "Split – Verify Data" process, Tally Prime conducts a thorough examination of the entire dataset. This includes scrutinizing all transactions, vouchers, ledgers, and other financial elements stored within the company's database.
- Error Detection: The primary purpose of data verification is to identify any potential errors, inconsistencies, or discrepancies within the company's data. Tally Prime meticulously examines each component of the data to ensure that it adheres to established accounting standards and principles.
- Validation Checks: During the verification process, Tally Prime conducts various validation checks to verify the accuracy and validity of the data. These checks may include verifying numerical accuracy, cross-referencing transactions, and ensuring compliance with regulatory requirements.
- Identification of Issues: If any discrepancies or issues are detected during the verification process, Tally Prime highlights them for the user's attention. This enables users to identify and address any data-related issues promptly, ensuring data accuracy and integrity.
- Enhanced Data Reliability: By performing regular data verification procedures, users can enhance the reliability and trustworthiness of their financial data. This helps ensure that the company's financial records are accurate and dependable, which is crucial for making informed business decisions.
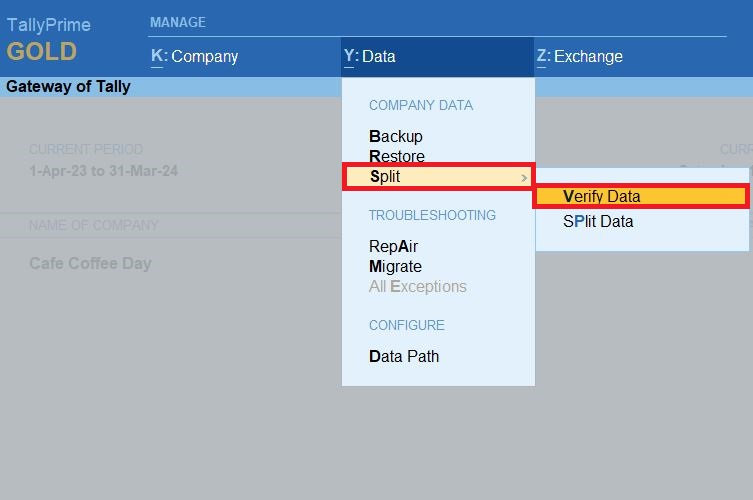
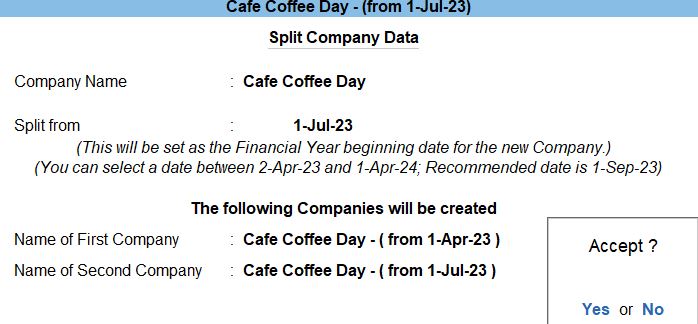
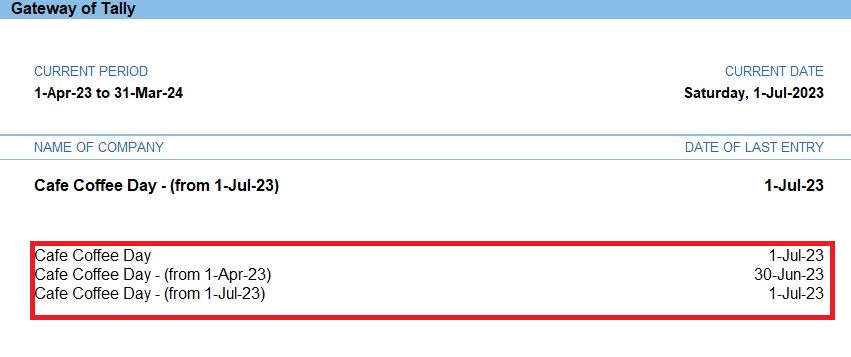
Split Data
- Selecting Data to Split: Before initiating the split process, users can specify the range of data they want to split. This typically involves selecting a start date and end date to determine which transactions and records will be included in the split files.
- Creating Split Files: Once the data range is defined, Tally Prime generates multiple split files based on the specified criteria. Each split file contains a portion of the company's data within the selected date range.
- Organizing Split Files: The split files are organized in a structured manner, making it easy for users to manage and access specific segments of their data. Each split file may represent a specific time period or category of transactions, depending on the user's requirements.
- Reducing File Size: Splitting data into smaller files helps reduce the overall size of each individual file. This can be advantageous for users who need to work with limited storage space or who encounter performance issues when handling large datasets.
- Facilitating Data Management: Splitting data makes it easier to manage and manipulate specific portions of the company's records. Users can focus on relevant data subsets without having to navigate through the entire dataset, streamlining their workflow and improving productivity.
- Archiving and Sharing: Split data files can be archived for long-term storage or shared with other users as needed. This allows users to maintain a backup of their historical data while also facilitating collaboration and data exchange within the organization.
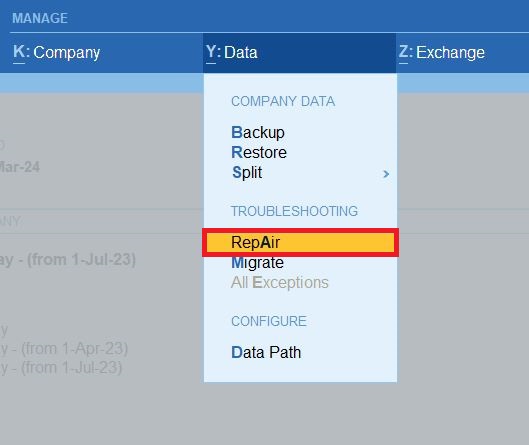
Repair
- Identifying Data Issues: Before initiating the repair process, users need to identify any data-related issues or inconsistencies. These issues may include data corruption, missing records, incorrect entries, or other anomalies that affect the accuracy and reliability of the data.
- Accessing Data Repair Function: Users can access the "Data Repair" feature from the Data menu in Tally Prime. This option allows them to initiate the repair process and address the identified data issues.
- Selecting Repair Options: Upon selecting the "Data Repair" option, users are presented with various repair options and configurations. These options may include repairing data files, fixing data corruption, recovering lost data, or resolving specific data-related errors.
- Executing Repair Process: Once the repair options are configured, users can proceed to execute the repair process. Tally Prime automatically performs the necessary tasks to address the identified data issues and restore the integrity of the company's data files.
- Monitoring Repair Progress: During the repair process, users can monitor the progress and status of the operation. Tally Prime provides real-time feedback and notifications to inform users about the repair status, including any errors encountered or issues resolved.
- Verifying Data Integrity: After the repair process is completed, users should verify the integrity of the data to ensure that the identified issues have been successfully addressed. They can review the repaired data files and cross-check them with the original records to confirm the accuracy and consistency of the data.
- Taking Preventive Measures: To prevent future data issues, users should implement preventive measures such as regular data backups, data validation checks, and adherence to best practices for data entry and management. These measures help mitigate the risk of data corruption or errors and maintain the integrity of the company's financial records.
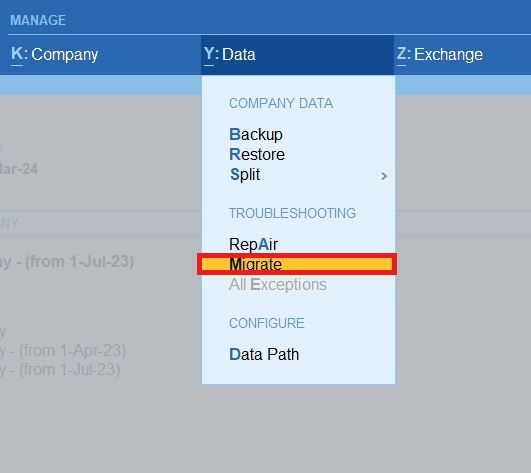
Migrate
- Compatibility Check: Before initiating the migration process, Tally Prime performs a compatibility check to ensure that the existing data can be migrated successfully to the latest version. This check verifies various aspects such as data integrity, format compatibility, and potential conflicts with new features.
- Backup Creation: As a precautionary measure, users are prompted to create a backup of their existing Tally data before starting the migration process. This backup serves as a safety net in case any issues arise during or after the migration.
- Migration Process: Once the backup is created and the compatibility check is complete, users can proceed with the migration process. Tally Prime automatically migrates the existing data to the latest version, ensuring that all relevant information, configurations, and settings are preserved during the transition.
- Data Transformation: During the migration process, Tally Prime may perform certain data transformations or updates to align the existing data with the new version's data model or schema. This ensures that the migrated data remains consistent and compatible with the latest software architecture.
- Verification and Validation: After the migration is complete, Tally Prime verifies and validates the migrated data to ensure accuracy, integrity, and completeness. This step involves cross-referencing the migrated data with the original data to identify any discrepancies or anomalies that may have occurred during the migration process.
- Completion and Confirmation: Once the migration process is successfully completed and the data is verified, Tally Prime provides users with a confirmation message indicating that the migration was successful. Users can then proceed to use the migrated data in the latest version of Tally Prime with confidence.
Tally Prime
Learn All in Tamil © Designed & Developed By Tutor Joes | Privacy Policy | Terms & Conditions