Mastering Multi-Currency Management in Tally Prime
Company Creation
- Open Tally Prime: Launch Tally Prime on your computer.
- Go to Company Creation: From the main menu, navigate to the Company menu. Then, select the option to create a new company. You can typically find this under "Company" or by using the shortcut Alt + K.
- Enter Company Details:
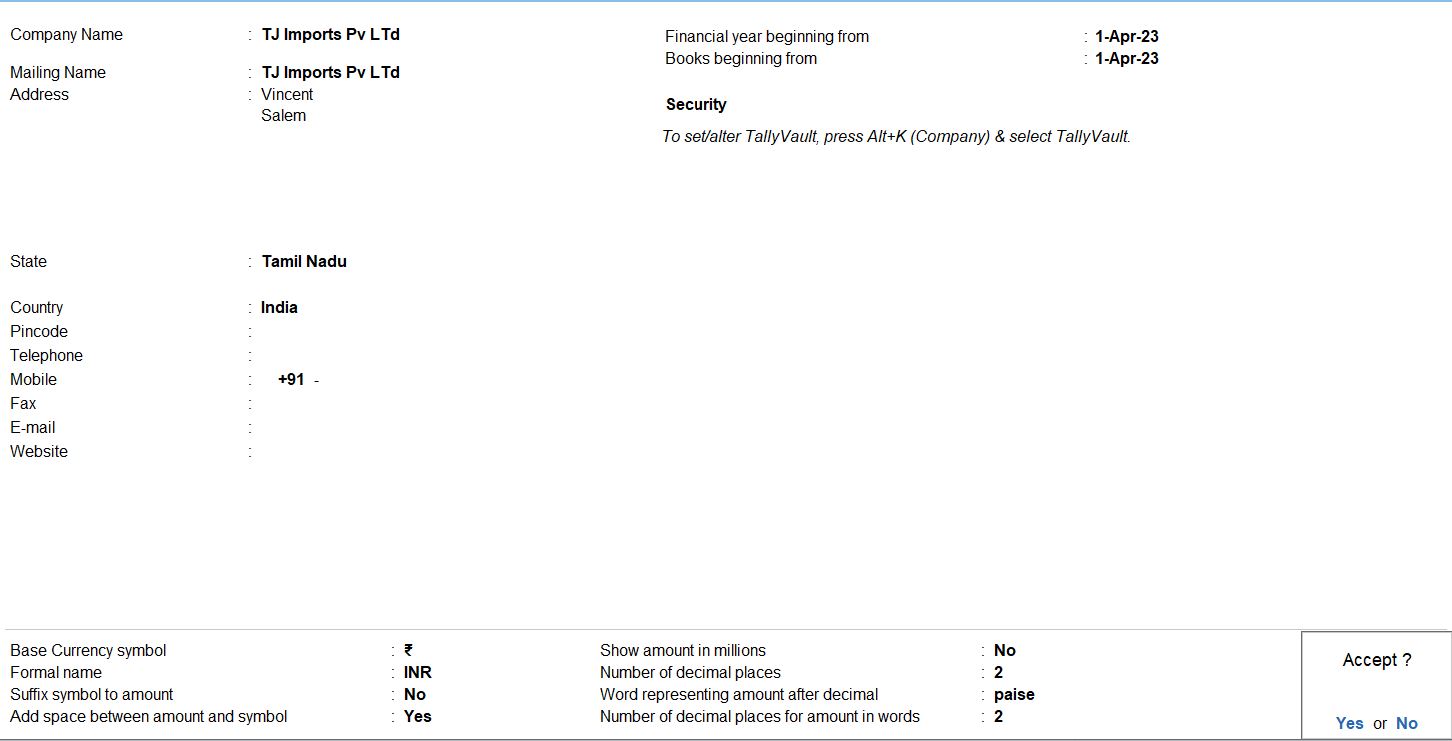
- Company Name: Enter "TJ Imports Pvt Ltd" in the field provided.
- Address: Enter "Vincent, Salem" as the address.
- State: Select "Tamil Nadu" from the dropdown menu.
- Country: Choose "India" from the available options.
- Telephone: Enter the telephone number if available.
- Fax: If applicable, enter the fax number.
- Email: Enter the company's email address.
- Website: If the company has a website, enter the URL.
- Set Financial Year: Tally Prime typically prompts you to set the financial year when creating a new company. Since you specified that the financial year begins from 1-Apr-23, ensure that you set the financial year accordingly during the company creation process.
- Save and Finish: After entering all the required details, review the information to ensure accuracy. Once you're satisfied, save the company details. Tally Prime will then create the company with the provided information.
Currency
- Access Gateway of Tally: Open Tally Prime on your computer and navigate to the Gateway of Tally, which is the main menu interface.
- Navigate to Currency Creation: From the Gateway of Tally, select "Create" under the "Accounting Masters" section. This option allows you to create various accounting-related entities, including currencies.
- Select Currency: After selecting "Create" under Accounting Masters, you will see a list of options. Choose "Currency" from this list to proceed with creating a new currency.
-
Enter Currency Details:
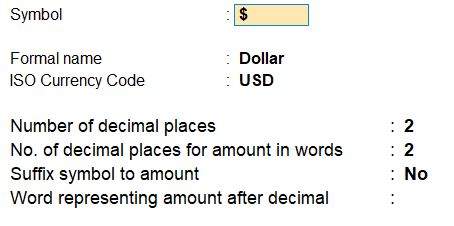
- Name: Enter the name of the currency you want to create. For example, if you're creating US Dollar, enter "USD."
- Symbol: Input the symbol associated with the currency. For example, "$" for US Dollar.
- Formal Name: This field typically auto-populates based on the name and symbol entered. It represents the full formal name of the currency.
- Number of Decimal Places: Specify the number of decimal places for the currency. For example, USD typically has two decimal places.
- Convertibility: Choose the appropriate option based on whether the currency is convertible or not.
- Rate of Exchange: If applicable, you can enter the rate of exchange for the currency against the base currency (usually your local currency). This rate helps in currency conversion within Tally.
- Save: After entering all the necessary details, review them for accuracy. Once you're satisfied, save the currency details. Tally Prime will then create the new currency with the provided information.
Euro Creation
- Access Gateway of Tally: Open Tally Prime and navigate to the Gateway of Tally, which serves as the main menu interface.
- Navigate to Currency Creation: From the Gateway of Tally, select "Create" under the "Accounting Masters" section. This option allows you to create various accounting-related entities, including currencies.
- Select Currency: After selecting "Create" under Accounting Masters, you will see a list of options. Choose "Currency" from this list to proceed with creating a new currency.
-
Enter Currency Details:
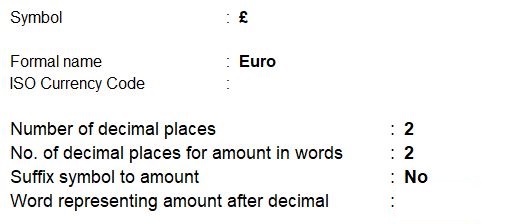
- Symbol: Enter the symbol associated with the currency. In this case, it is "£".
- Alt Code: You can input the Alt code to represent the symbol. For "£", the Alt code is 156.
- Formal Name: Enter the formal name of the currency. In this example, it's "Euro."
- ISO Currency Code: If applicable, you can enter the ISO currency code for the currency.
- Number of Decimal Places: Specify the number of decimal places for the currency. In this case, it's 2.
- Show Amount in Millions: Choose whether you want amounts to be shown in millions. Select "No" if you don't want this feature.
- Suffix Symbol to Amount: Decide whether to suffix the symbol to the amount. Choose "No" if you don't want this feature.
- Add Space Between Amount and Symbol: Choose whether you want to add a space between the amount and the symbol. Select "No" if you don't want this.
- Word Representing Amount After Decimal: Specify the word to represent the amount after the decimal point, if required.
- No. of Decimal Places for Amount in Words: Specify the number of decimal places for amounts expressed in words.
- Save: After entering all the necessary details, review them for accuracy. Once you're satisfied, save the currency details. Tally Prime will then create the new currency with the provided information.
Yen Creation
- Access Gateway of Tally: Open Tally Prime and navigate to the Gateway of Tally, which serves as the main menu interface.
- Navigate to Currency Creation: From the Gateway of Tally, select "Create" under the "Accounting Masters" section. This option allows you to create various accounting-related entities, including currencies.
- Select Currency: After selecting "Create" under Accounting Masters, you will see a list of options. Choose "Currency" from this list to proceed with creating a new currency.
-
Enter Currency Details:
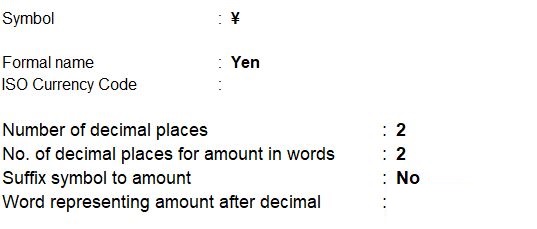
- Symbol: Enter the symbol associated with the currency. In this case, it is "¥".
- Alt Code: You can input the Alt code to represent the symbol. For "¥", the Alt code is 157.
- Formal Name: Enter the formal name of the currency. In this example, it's "Yen."
- ISO Currency Code: If applicable, you can enter the ISO currency code for the currency.
- Number of Decimal Places: Specify the number of decimal places for the currency. In this case, it's 2.
- Show Amount in Millions: Choose whether you want amounts to be shown in millions. Select "No" if you don't want this feature.
- Suffix Symbol to Amount: Decide whether to suffix the symbol to the amount. Choose "No" if you don't want this feature.
- Add Space Between Amount and Symbol: Choose whether you want to add a space between the amount and the symbol. Select "No" if you don't want this.
- Word Representing Amount After Decimal: Specify the word to represent the amount after the decimal point, if required.
- No. of Decimal Places for Amount in Words: Specify the number of decimal places for amounts expressed in words.
- Save: After entering all the necessary details, review them for accuracy. Once you're satisfied, save the currency details. Tally Prime will then create the new currency with the provided information.
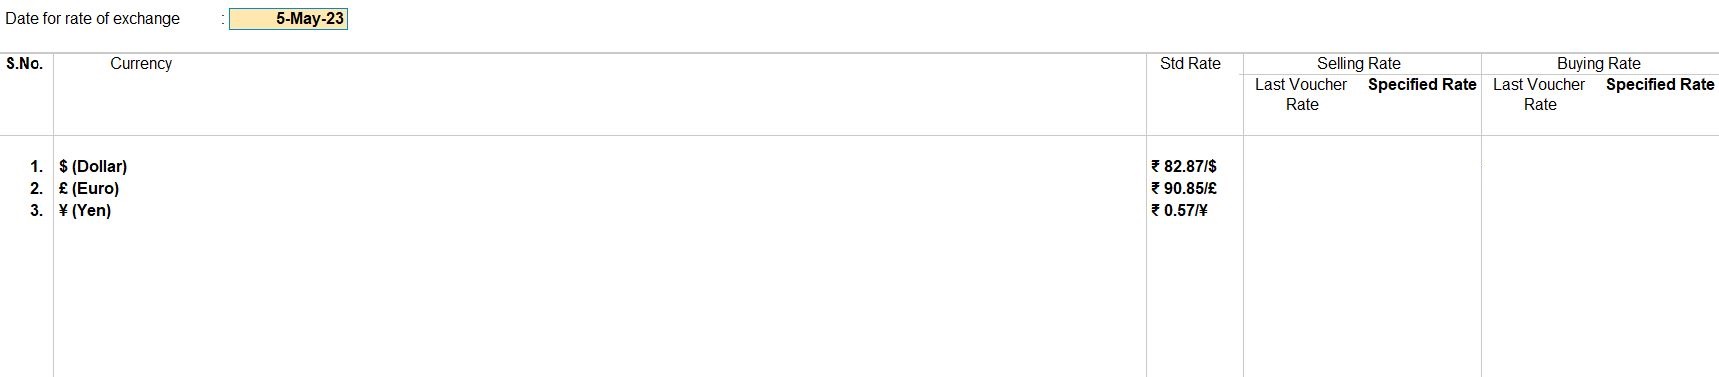
Rates of Exchange
- Navigate to Rates of Exchange: From the Gateway of Tally, select "Create" under the "Accounting Masters" section. Then, choose "Rates of Exchange" from the list of options. This allows you to set up exchange rates for various currencies.
-
Enter Exchange Rates:
- Currency: Enter the name of the currency for which you want to set up the exchange rate. In this case, you'll enter "Dollar," "Euro," and "Yen" for the respective currencies.
- Standard Rate: Input the standard exchange rate for each currency. This represents the base rate for conversion.
- Selling Rate: If applicable, you can enter the selling rate for each currency. This rate is typically used when you are selling the currency.
- Buying Rate: Similarly, you can enter the buying rate for each currency. This rate is used when you are buying the currency.
- Save: After entering the exchange rates for all the currencies, review the information for accuracy. Once you're satisfied, save the details. Tally Prime will then save the rates of exchange for the specified currencies.
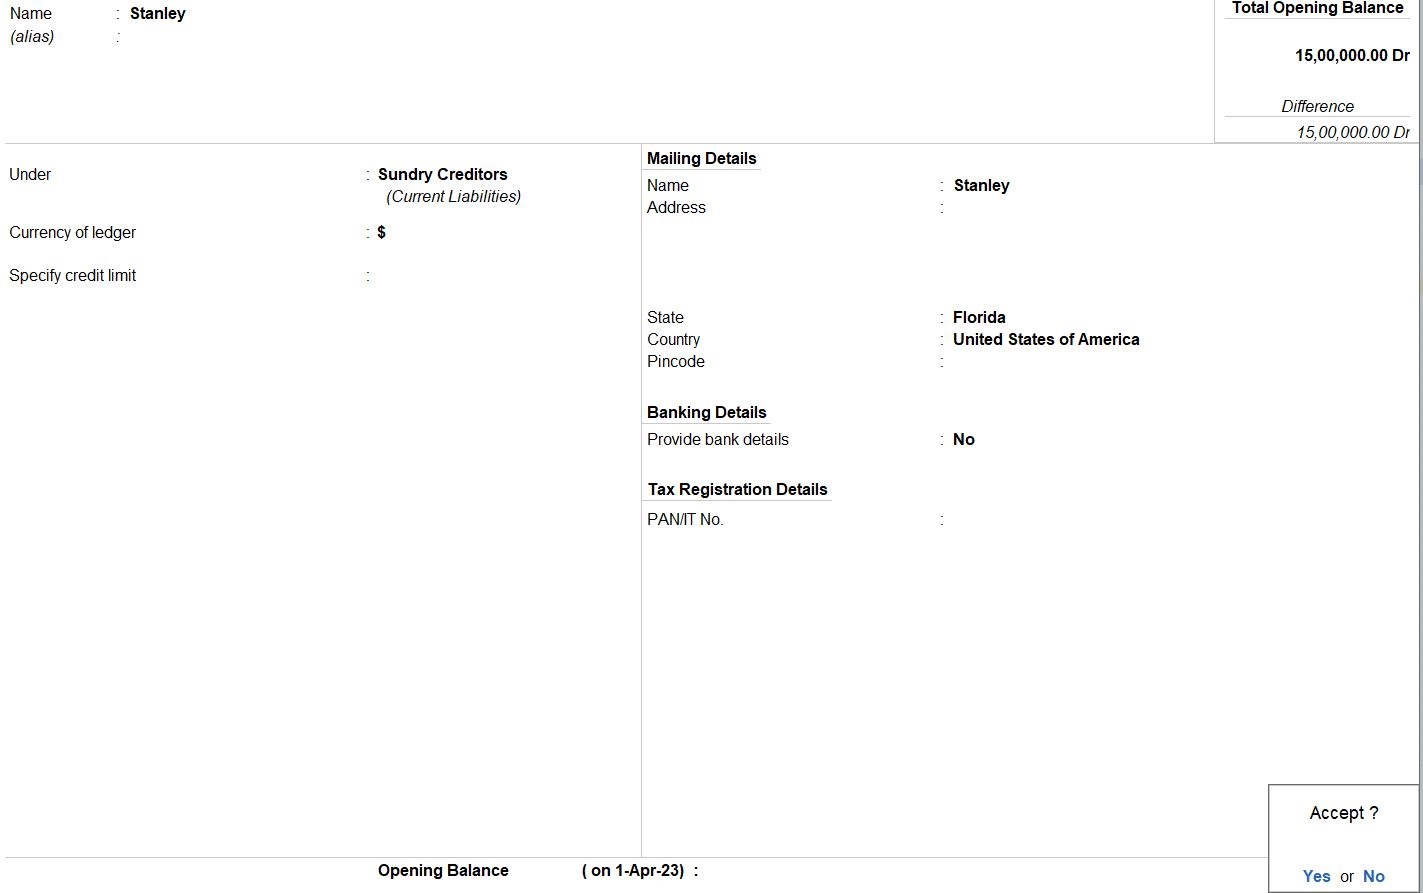
Ledger Creation
- Navigate to Ledger Creation: From the Gateway of Tally, select "Create" under the "Accounting Master" section. Then, choose "Ledger" from the list of options. This allows you to create a new ledger.
-
Enter Ledger Details:
- Name: Enter "Stanley" in the field provided.
- Under: Select "Sundry Creditors" from the list of available groups. This categorizes the ledger under the appropriate group.
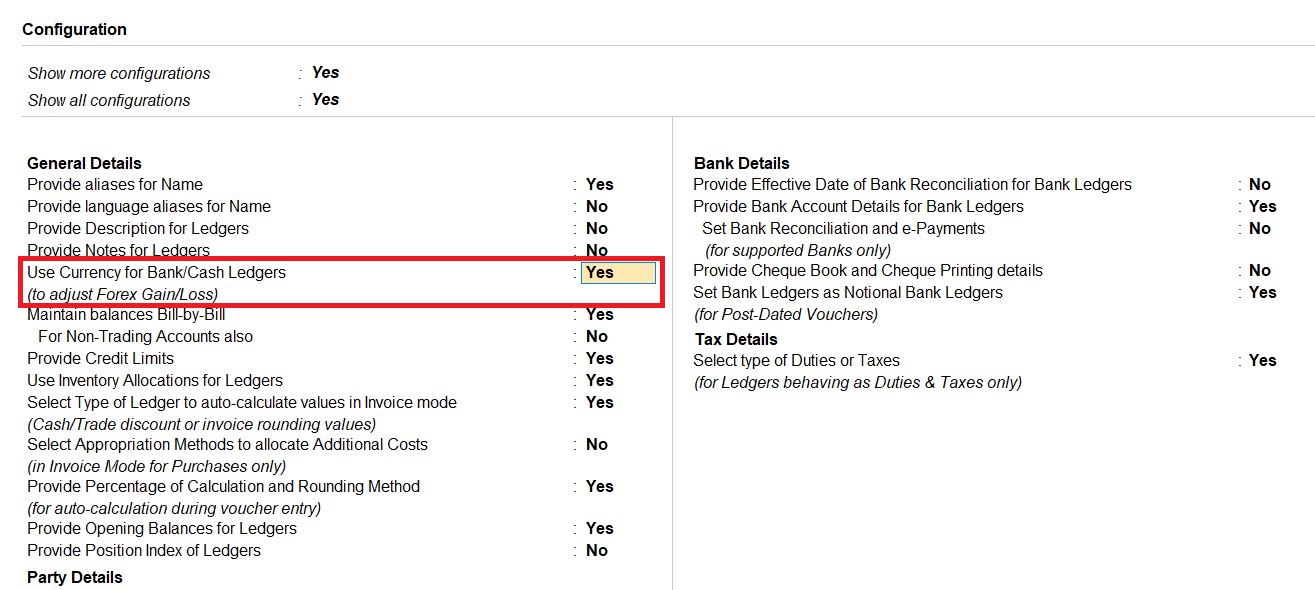
- F12 – Use Currency for Bank/Cash Ledgers: Press F12 key to access ledger configuration settings. In the Ledger Configuration screen, ensure that "Use Currency for Bank/Cash Ledgers" is set to "Yes". This setting allows you to assign a currency to the ledger.
- Currency of Ledger: Since you've enabled currency usage for the ledger, you can specify the currency. Enter "$" as the currency symbol representing US Dollar.
- State: Enter "Florida" as the state.
- Country: Select "United States of America" from the list of available countries.
- Save: After entering all the necessary details, review them for accuracy. Once you're satisfied, save the ledger details. Tally Prime will then create the ledger with the provided information including the currency settings.
Purchase -US – Import
- Navigate to Ledger Creation: From the Gateway of Tally, select "Create" under the "Accounting Master" section. Then, choose "Ledger" from the list of options. This allows you to create a new ledger.
-
Enter Ledger Details:
- Name: Enter "Purchase - US - Import" in the field provided.
- Under: Select "Purchase Accounts" from the list of available groups. This categorizes the ledger under the appropriate group.
- Inventory values are affected: Choose "Yes" to indicate that inventory values are affected by transactions involving this ledger. This means that transactions recorded using this ledger will impact inventory levels in Tally Prime.
- Save: After entering all the necessary details, review them for accuracy. Once you're satisfied, save the ledger details. Tally Prime will then create the ledger with the provided information.

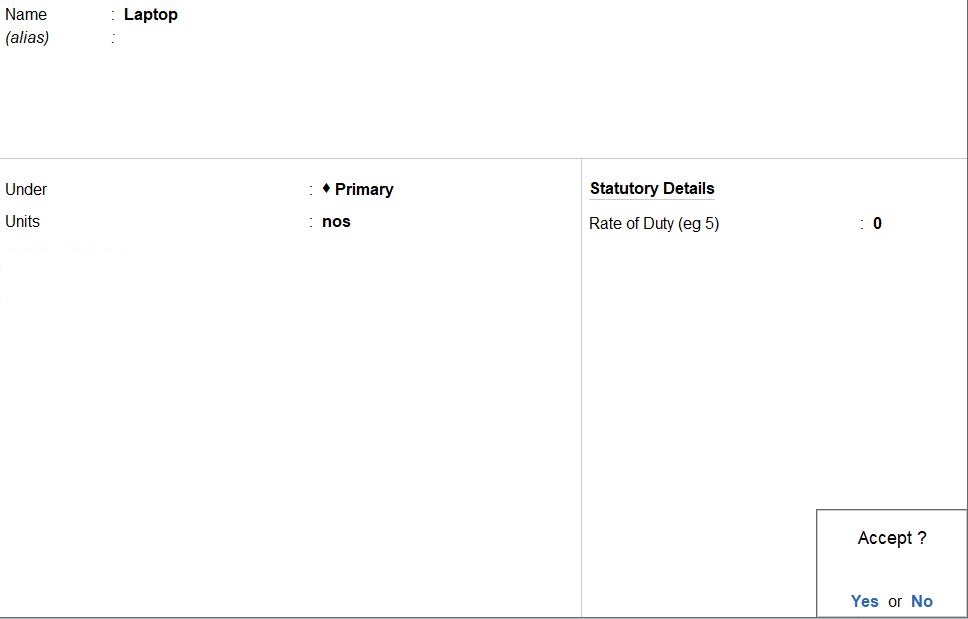
Stock in Creation
- Access Gateway of Tally: Open Tally Prime and navigate to the Gateway of Tally.
- Navigate to Ledger Creation: From the Gateway of Tally, select "Create" under the "Master" section. Then, choose "Ledger" from the list of options. This allows you to create a new ledger.
-
Enter Ledger Details:
- Name: Enter "Laptop" in the field provided.
- Under: Since you want to create this ledger under a group called "Primary", you'll need to create the group first if it doesn't exist. However, if the group already exists, select "Primary" from the list of available groups. The "Primary" group is typically used for primary ledgers that are not classified under other specific groups.
- Units: Specify the units in which transactions involving this ledger will be measured. In this case, enter "Nos" to indicate "Numbers", meaning that the quantity of laptops will be measured in whole units.
- Save: After entering all the necessary details, review them for accuracy. Once you're satisfied, save the ledger details. Tally Prime will then create the ledger with the provided information, including the unit of measurement.
Purchase Voucher
- Navigate to Vouchers: Click on the "Vouchers" option from the main menu.
- Select Purchase Voucher: Choose "Purchase Voucher" from the list of voucher types.
- Fill in Party A/c Name: In the purchase voucher screen, enter "Stanley" in the "Party A/c Name" field.
- Choose Purchase Ledger: Select "Purchase – US -Import" from the list of available purchase ledgers.
-
Enter Item Details: Enter the details of the purchased item, in this case, laptops:
- Name of Item: Laptop
- Quantity: 100 nos
- Rate in USD: $72.00 per nos
- Amount: $7200.00 (which will be auto-calculated based on the quantity and rate)
-
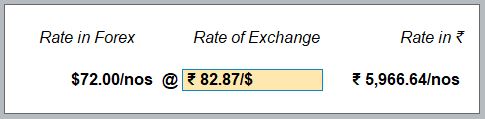
Enter Forex Details: Since the rate is given in Forex, you need to input the Forex details:
- Rate in Forex: $72.00/nos
- Rate of Exchange: Rs. 82.87/$
- Rate in Rs.: 5966.64/nos (which will be auto-calculated)
- Save the Voucher: Once all details are entered accurately, save the voucher.

Payment Voucher
- Navigate to Vouchers: Click on the "Vouchers" option from the main menu.
- Select Payment Voucher: Choose "Payment Voucher" from the list of voucher types.
- Choose Single Entry Mode: Before entering any details, make sure you're in Single Entry Mode. You can toggle between Single and Double Entry modes using the appropriate shortcut or menu option.
- Fill in Mode Account: In the payment voucher screen, enter "Indian Bank" in the "Account" field.
-
Enter Payment Details: Enter the payment details:
- Particulars: Stanley
- Amount: $7200.00 (this is the amount you're paying to Stanley)
-
Enter Forex Details: Since the rate is given in Forex, you need to input the Forex details:
- Rate in Forex: $72.00/nos
- Rate of Exchange: Rs. 81.57/$
- Rate in Rs.: 587304.00/nos (which will be auto-calculated)

- Save the Voucher: Once all details are entered accurately, save the voucher.

Forex Gain
- Navigate to Gateway of Tally: Click on "Gateway of Tally" to access the main menu.
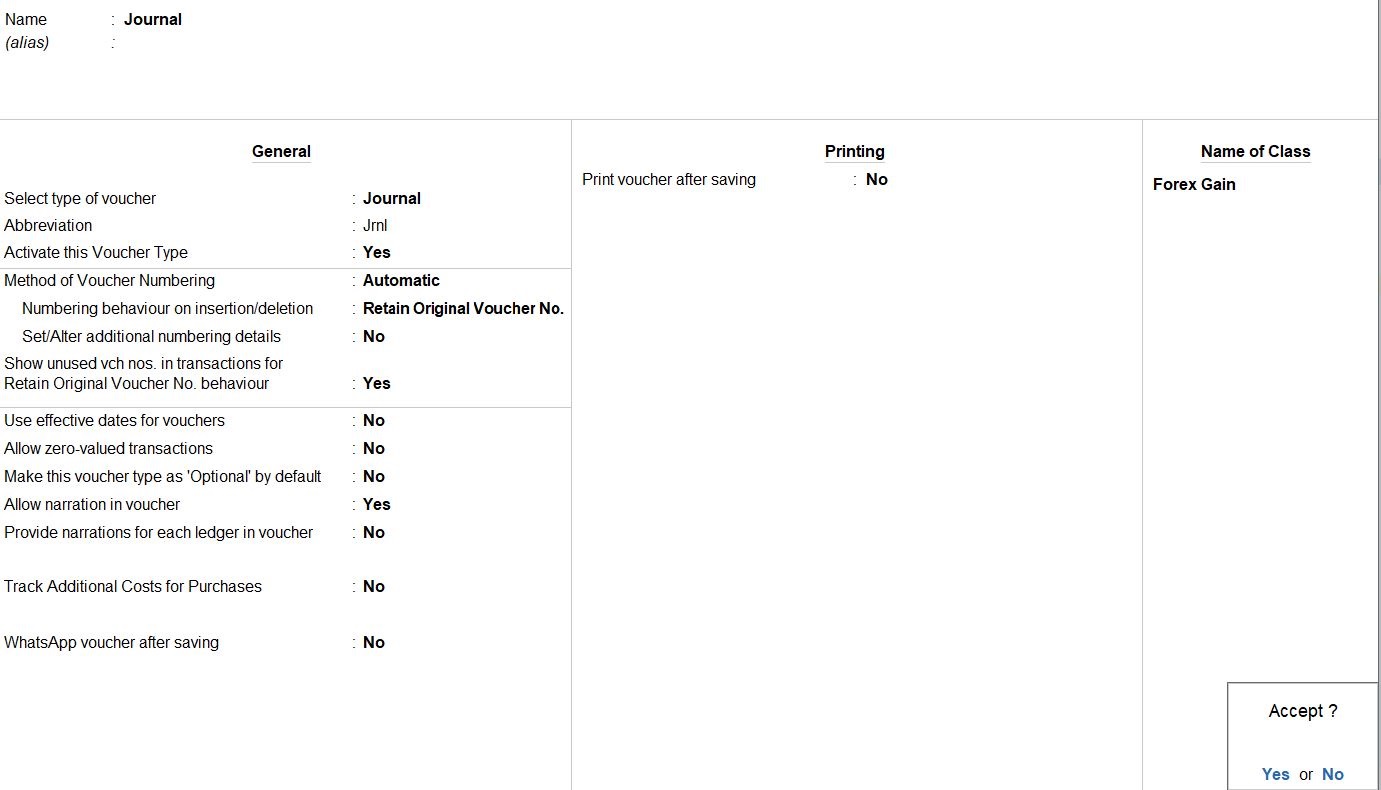
- Go to Alter: Under the Gateway of Tally menu, select "Alter."
- Select Voucher Type: Choose "Voucher Type" from the alter options.
- Choose Journal Voucher Type: Locate "Journal" from the list of voucher types and select it for alteration.
-
Add Class for Forex Gain/Loss: Within the alteration mode for the Journal voucher type, you'll add a class for Forex Gain and configure it to be used for Forex Gain/Loss adjustments. Here's how:
- Enter "Forex Gain" in the field labeled "Name of Class."
- Set "Use Class for Forex Gain/Loss Adjustment" to "Yes."

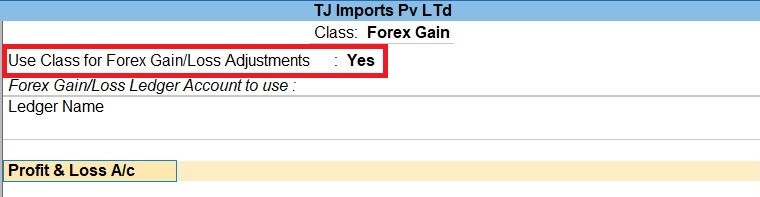
- Modify Ledger Name: To ensure that transactions related to Forex Gain are correctly recorded, you may need to modify the ledger name. Since you want to use the "Profit & Loss A/c" ledger for this purpose, make sure it's appropriately configured for such transactions.
- Save the Alteration: After making the necessary modifications, save the alterations.
Voucher Class Forex Gain
- Navigate to Journal Voucher: Click on "Vouchers" to access the voucher creation menu, then select "Journal Voucher."
- Add Voucher Class: In the journal voucher creation screen, locate the option to add a voucher class. Here, you would add the voucher class named "Forex Gain."
- Select Account: Choose the appropriate account for this transaction. In this case, select the "Profit & Loss A/c" ledger.
-
Enter Particulars and Amount: Input the transaction details:
- Particulars: Enter "Stanley" to indicate that this transaction involves Stanley.
- Amount: Enter the amount, which is $9360.
- Save the Voucher: Once all details are entered accurately, save the journal voucher.

Ledger Creation
- Navigate to Ledger Creation: Click on "Create" from the main menu, then select "Accounts Masters" followed by "Ledgers."
- Create a New Ledger: In the ledger creation screen, choose to create a new ledger.
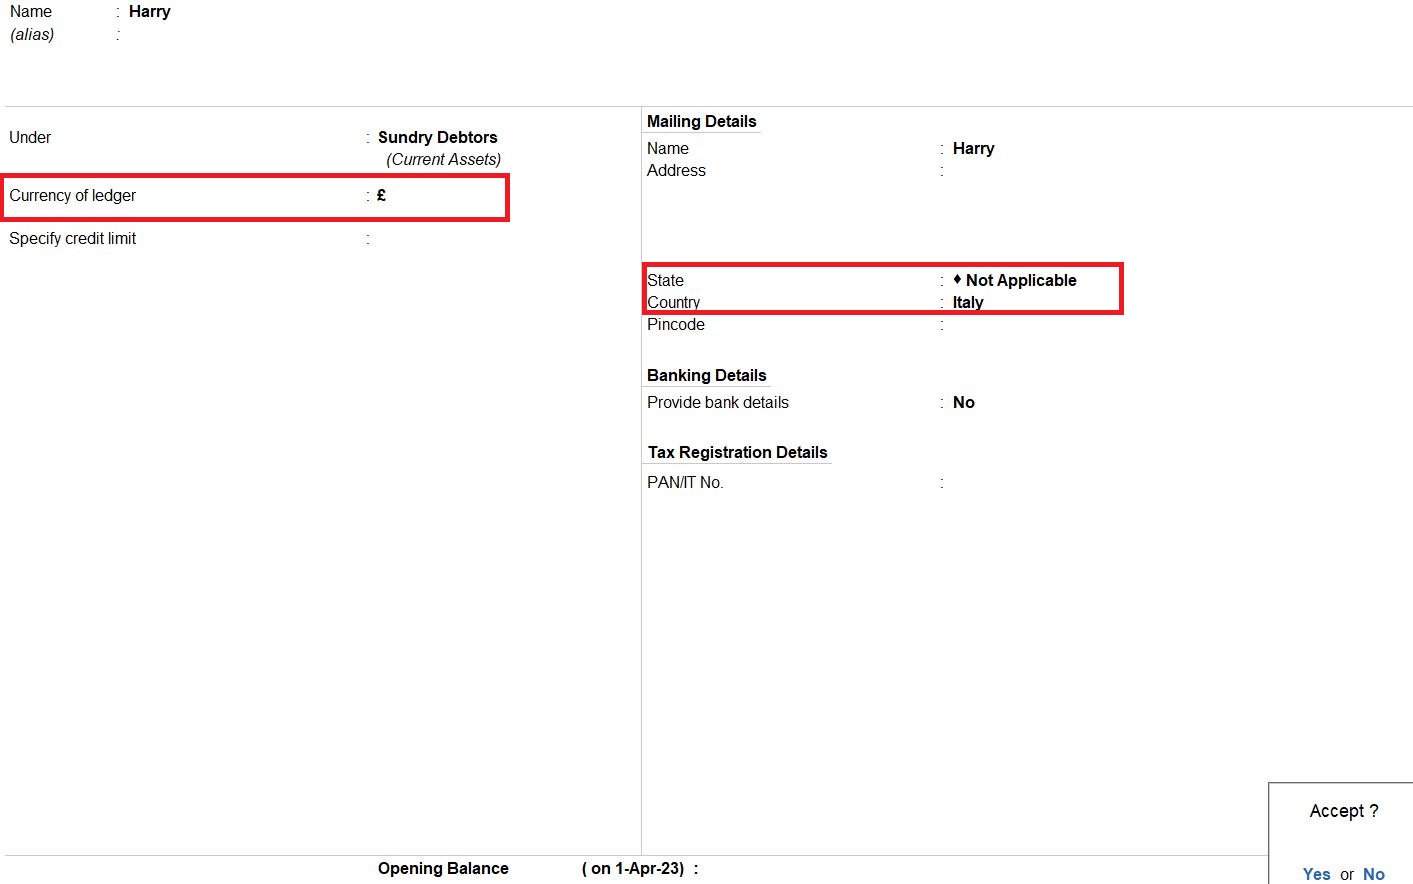
- Enter Ledger Name: Input the name "Harry" in the "Name" field.
- Select Under Group: Choose "Sundry Debtors" from the list of groups to categorize Harry's ledger under Sundry Debtors.
- Set Currency: Specify the currency for this ledger as pounds (£). You might find an option like "Currency" or "Currency of Ledger" where you can select the currency symbol (£) from the available options.
- State and Country: Since Harry's ledger is under Sundry Debtors and you're setting it up for a country outside India, you might not have fields for state and country. If there are fields for state and country, set them to "Not Applicable" and "Italy" respectively.
- Save the Ledger: Once all details are entered correctly, save the ledger.
Sales Voucher
- Navigate to Vouchers: Click on "Vouchers" to access the voucher creation menu.
- Select Sales Voucher: Choose "Sales Voucher" from the list of voucher types.
- Fill in Party A/c Name: In the sales voucher screen, enter "Harry" in the "Party A/c Name" field.
- Choose Sales Ledger: Select the appropriate sales ledger. In this case, choose "Sales" from the list.
- Enter Item Details: Input the details of the sold item:
- Name of Item: Laptop
- Quantity: 50 nos
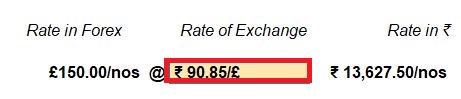
- Rate in £: £150.00 per nos
- Amount: £7500.00 (which will be auto-calculated based on the quantity and rate)
- Enter Forex Details: Since the rate is given in Forex, you need to input the Forex details:
- Rate in Forex: £150.00/nos
- Rate of Exchange: Rs. 90.85/£
- Rate in Rs.: Rs. 13627.50/nos (which will be auto-calculated)
- Save the Voucher: Once all details are entered accurately, save the voucher.

Receipt Voucher
- Navigate to Vouchers: Click on "Vouchers" to access the voucher creation menu.
- Select Receipt Voucher: Choose "Receipt Voucher" from the list of voucher types.
- Fill in Account Details: In the receipt voucher screen, select "Indian Bank" in the "Account" field.
- Enter Particulars and Amount: Input the details of the receipt:
- Particular: Enter "Harry" to indicate the source of the receipt.
- Amount: Enter the amount received, which is £7500.
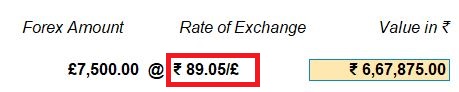
- Enter Forex Details: Since Forex exchange rates are provided, you need to input these details:
- Forex Amount: £7500.00
- Rate of Exchange: Rs. 89.05/£
- Value: Rs. 667875.00 (which will be auto-calculated based on the Forex amount and rate)
- Save the Voucher: Once all details are entered accurately, save the voucher.

Forex Loss
- Navigate to Gateway of Tally: Click on "Gateway of Tally" to access the main menu.
- Go to Alter Voucher Type: Under the Gateway of Tally menu, select "Alter," then choose "Voucher Type."
- Select Journal Voucher Type: From the list of voucher types, select "Journal."
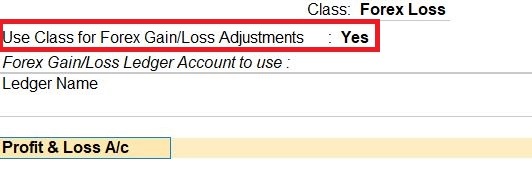
- Add Name of Class: Within the alteration mode for the Journal voucher type, add a class for Forex Loss:
- Enter "Forex Loss" in the field labeled "Name of Class."
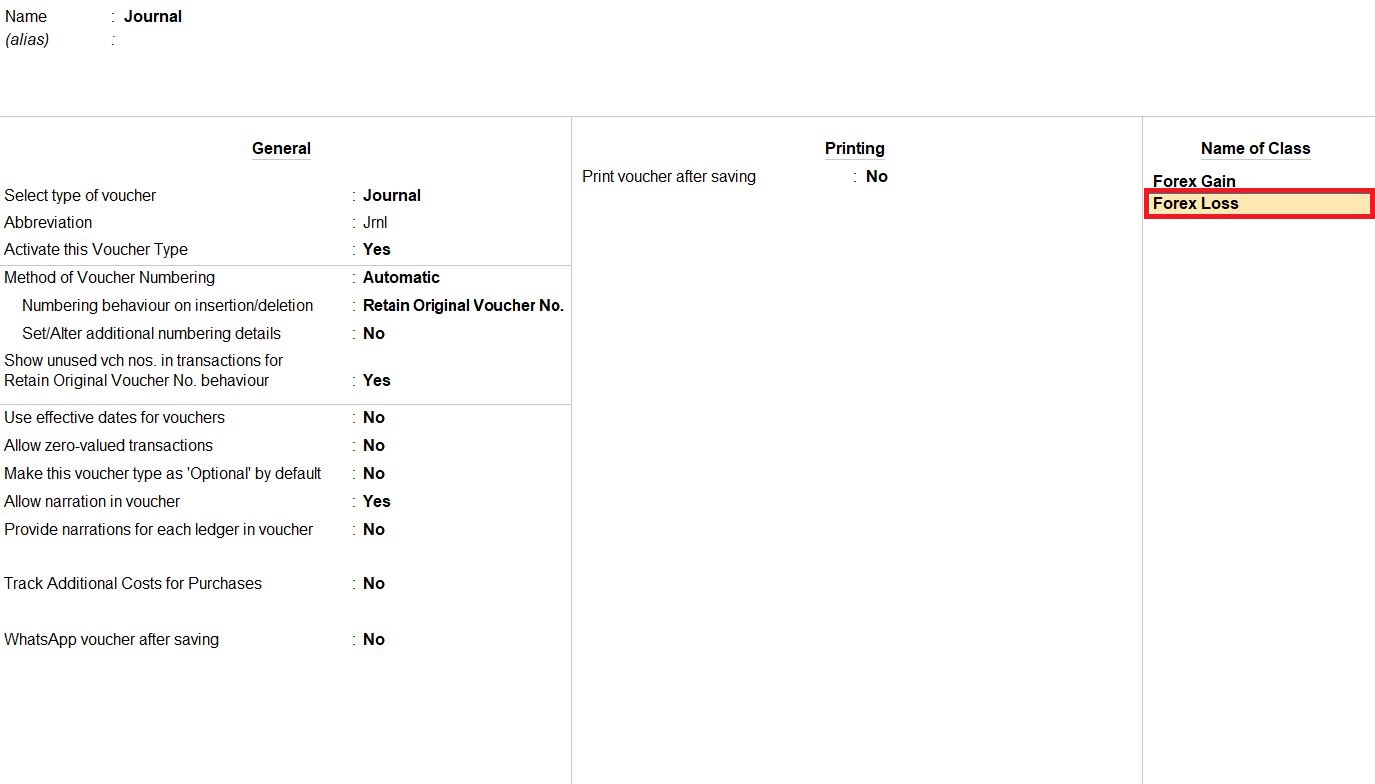
- Set Use Class for Forex Gain/Loss Adjustment: Ensure that the option "Use Class For Forex Gain/Loss Adjustment" is set to "Yes."
- Specify Forex Gain/Loss Ledger Account: Since you want to record Forex Gain/Loss under the "Profit & Loss A/C" ledger, you need to specify this ledger for Forex Gain/Loss adjustments:
- Choose the appropriate field or option where you can specify the ledger account.
- Select "Profit & Loss A/C" as the ledger account to use for Forex Gain/Loss adjustments.
- Save the Alteration: Once all the necessary configurations are made, save the alteration.

Journal Voucher Forex Loss
- Navigate to Journal Voucher: Click on "Vouchers" to access the voucher creation menu, then select "Journal Voucher."
- Add Voucher Class: In the journal voucher creation screen, locate the option to add a voucher class. Here, add the voucher class named "Forex Loss."
- Select Account: Choose the appropriate account for this transaction. In this case, select the "Profit & Loss A/c" ledger.
- Enter Particulars and Amount: Input the transaction details:
- Particulars: Enter "Herry" to indicate the source of the transaction.
- Amount: Enter the amount received from Herry, which is £13500.
- Save the Voucher: Once all details are entered accurately, save the journal voucher.

Reports
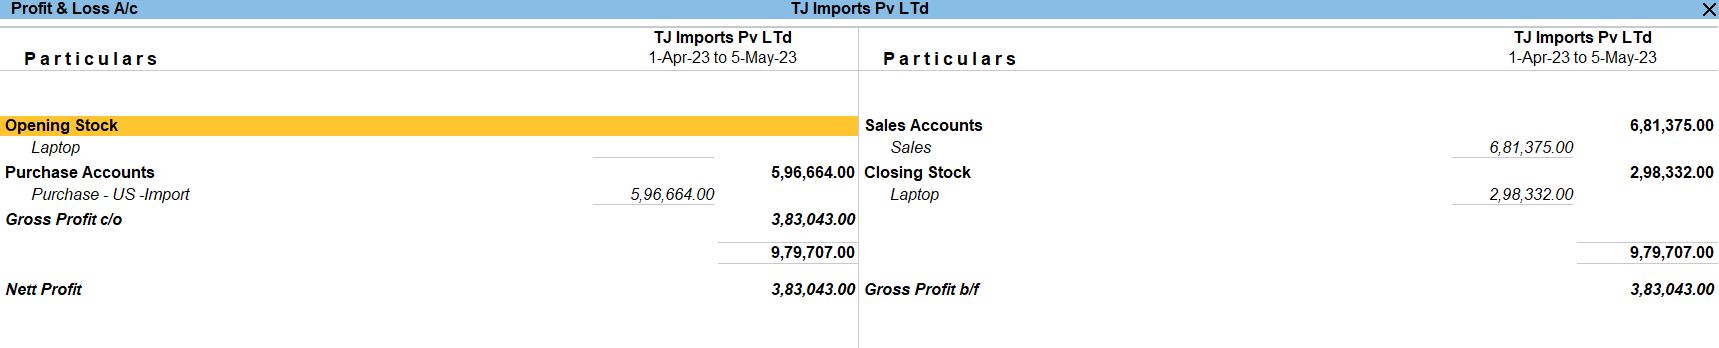
Profit & Loss
- Navigate to Reports: Click on "Reports" from the main menu.
- Access Financial Reports: Under the Reports menu, find the "Financial Statements" section.
- Select Profit & Loss: In the Financial Statements section, choose "Profit & Loss."
- Choose Period: Tally Prime will prompt you to select the period for the report.
- View the Report: After selecting the period, Tally Prime will generate the Profit & Loss report.
- Analyze the Report: Analyze the report to understand your business's financial performance.
- Customize the Report (Optional): Customize the report according to your requirements.
- Save or Print the Report (Optional): Save or print the report for future reference or documentation.
Balance Sheet
- Navigate to Reports: Click on the "Reports" option from the main menu.
- Select Balance Sheet: Under the reports menu, navigate to "Balance Sheet."
- Set the Appropriate Date Range: You will be prompted to set the date range for the balance sheet.
- View the Balance Sheet: Once the date range is set, the balance sheet will be generated and displayed on your screen.
- Navigate through the Balance Sheet: Navigate through the balance sheet using the arrow keys or mouse scroll.
- Export or Print: Export the balance sheet to various formats such as PDF, Excel, or print it directly from Tally Prime.
- Customize the Balance Sheet (Optional): Modify the balance sheet layout, add or remove columns, and customize headers and footers.
- Save or Memorize (Optional): Save or memorize the balance sheet for quick access later.

Tally Prime
Learn All in Tamil © Designed & Developed By Tutor Joes | Privacy Policy | Terms & Conditions