Creating Sticky Notes with JavaScript: A step-by-step guide
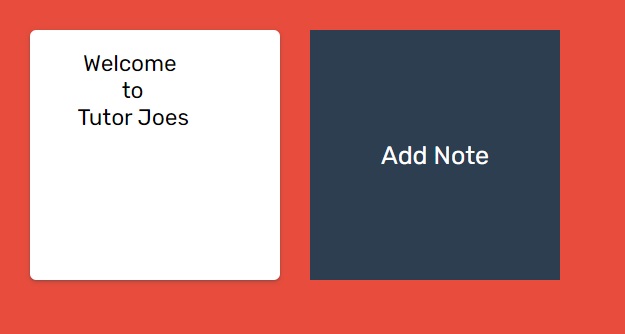
Sticky notes are a simple and popular way to organize and prioritize tasks and ideas. In web development, you can create sticky notes using JavaScript, HTML, and CSS.
Sticky notes are a simple and popular way to organize and prioritize tasks and ideas. In web development, you can create sticky notes using JavaScript, HTML, and CSS.
The basic functionality of a sticky note is to allow the user to create and edit notes, and then save them for later. To create a sticky note, you can use HTML to create the basic layout and structure of the note, and then use CSS to style it.
JavaScript is used to add interactivity and dynamic behavior to the sticky note. For example, you can use JavaScript to create event listeners that allow the user to edit the note by typing into a textarea or input field. You can also use JavaScript to add drag and drop functionality to the notes, so that the user can move them around the screen.
You can also use JavaScript to save the notes to the user's device using Local Storage. This allows the user to close the browser and come back later and the notes will still be there.
Overall, creating sticky notes with JavaScript is a great way to learn more about web development and the Document Object Model (DOM). It can also be a useful tool for creating interactive applications and games.
Source Code
<!DOCTYPE html>
<html lang="en">
<head>
  <meta charset="UTF-8">
  <meta http-equiv="X-UA-Compatible" content="IE=edge">
  <meta name="viewport" content="width=device-width, initial-scale=1.0">
  <title>Document</title>
  <link rel="stylesheet" href="css/style.css">
</head>
<body>
  <div id="container">
      <button class="btn-add">Add Note</button>
  </div>

  <script src="js/script.js"></script>
</body>
</html>
css/style.css
@import url('https://fonts.googleapis.com/css2?family=Rubik:wght@300;400;500;600;700;900&display=swap');


*{
  margin: 0;
  padding: 0;
  box-sizing: border-box;
  font-family: 'Rubik', sans-serif;

}

body{
  background-color: #e74c3c;
}


#container{
display: grid;
grid-template-columns: repeat(auto-fill,200px);
gap:24px;
padding:24px;
}

.sticky{
height: 200px;
padding: 16px;
border: none;
outline: none;
resize: none;
border-radius: 5px;
font-size: 18px;
box-shadow: rgba(60, 64, 67, 0.3) 0px 1px 2px 0px, rgba(60, 64, 67, 0.15) 0px 1px 3px 1px;
}

.btn-add{
height: 200px;
border: none;
outline: none;
color:#fff;
font-size: 20px;
background-color:#2c3e50;
cursor: pointer;
}
.btn-add:hover{
  background-color: #34495e;
  border-radius: 5px;
}
This script is for a web application that creates and manages "sticky notes" using JavaScript and Local Storage. The script starts by fetching a container element and a button element from the HTML page. Then, it defines several functions to interact with the sticky notes:
- getAppStorage(): retrieves the sticky notes from Local Storage and parses them as a JSON array
- createTextElement(id,content): creates a new sticky note with the given id and content, and adds event listeners for when the note is changed or double-clicked
- addSticky(): creates a new sticky note object and adds it to the container element and Local Storage
- saveNotes(notes): saves the given notes array to Local Storage
- updateNote(id,content): updates the content of the sticky note with the given id in Local Storage
- deleteNotes(id,textElement): removes the sticky note with the given id from Local Storage and the container element.
The script then calls the getAppStorage function to retrieve and display the sticky notes on page load, and adds an event listener to the button element to create a new sticky note when clicked.
js/script.js
const containerElement=document.getElementById("container");
const btnAdd=document.getElementsByClassName("btn-add")[0];


function getAppStorage(){
  return JSON.parse(localStorage.getItem("joes-app") || "[]");
}

getAppStorage().forEach(element => {
  const textElement=createTextElement(element.id,element.content);
  containerElement.insertBefore(textElement,btnAdd);
});

function createTextElement(id,content){
const textElement=document.createElement('textarea');
textElement.classList.add('sticky');
textElement.value=content;
textElement.placeholder='Enter Your Notes';

textElement.addEventListener("change",()=>{
  updateNote(id,textElement.value);
});

textElement.addEventListener("dblclick",()=>{
  const check=confirm("Are You Sure to Delete ?");
  if(check){
    deleteNotes(id,textElement);
  }
});

return textElement;

}

//Add New Sticky Note
function addSticky(){
  const notes=getAppStorage();
  const noteObject={
    id:Math.floor(Math.random()*100000),
    content:""
  }
  const textElement= createTextElement(noteObject.id,noteObject.content);
  containerElement.insertBefore(textElement,btnAdd);
  notes.push(noteObject);
  saveNotes(notes);
}

btnAdd.addEventListener('click',()=>addSticky());


function saveNotes(notes){
  localStorage.setItem("joes-app",JSON.stringify(notes));
}

//Update Sticky Note
function updateNote(id,content){
  const notes=getAppStorage();
  const updateElement=notes.filter((note)=>note.id==id)[0];
  updateElement.content=content;
  saveNotes(notes);
}


function deleteNotes(id,textElement){
  const notes=getAppStorage().filter((note)=>note.id!=id);
  saveNotes(notes);
  containerElement.removeChild(textElement);
}
Output

Live Preview
List of Programs
JavaScript Arrays & Methods Examples
JS Practical Project
Learn All in Tamil © Designed & Developed By Tutor Joes | Privacy Policy | Terms & Conditions