Understanding the Event Loop in JavaScript: Asynchronous Execution Made Simple
The event loop is a fundamental mechanism in JavaScript that enables asynchronous behavior and ensures smooth execution of code without blocking the main thread. It is at the core of JavaScript's concurrency model and plays a crucial role in handling events, executing callbacks, and managing asynchronous operations.
Here's a step-by-step explanation of how the event loop works in JavaScript:
- Execution Stack: When JavaScript code is executed, it maintains a stack called the execution stack. It keeps track of the currently running function or task.
- Task Queue: Alongside the execution stack, there is a task queue, also known as the callback queue or message queue. It holds tasks or events that are ready to be processed. These tasks can include timers, network requests, user interactions, and other asynchronous operations.
- Event-Driven Architecture: JavaScript is designed as an event-driven language. Events can be triggered by various sources, such as user actions (e.g., clicks), timers, or network responses. When an event occurs, a corresponding callback function (also known as an event handler) is generated and placed in the task queue.
- Event Loop: The event loop is a continuous process that checks two main entities the execution stack and the task queue.
- Event Loop Process:
- If the execution stack is empty and there are tasks in the task queue, the event loop moves the tasks from the task queue to the execution stack, starting with the oldest task.
- The task in the execution stack is processed, and its associated function is executed.
- While executing the function, if additional asynchronous tasks are encountered (e.g., AJAX requests or setTimeout), they are registered, and their corresponding callbacks are placed in the task queue.
- Once the function execution is complete, it is removed from the execution stack. The event loop repeats the process by checking the execution stack and the task queue.
- Non-Blocking Nature: The event loop ensures that JavaScript remains non-blocking. This means that while asynchronous operations are being performed, the main thread is free to handle other tasks or respond to user interactions without waiting for the completion of those asynchronous tasks.
By leveraging the event loop, JavaScript can efficiently handle concurrency, process asynchronous operations, and create responsive web applications. Understanding how the event loop works is crucial for writing efficient and per formant JavaScript code.
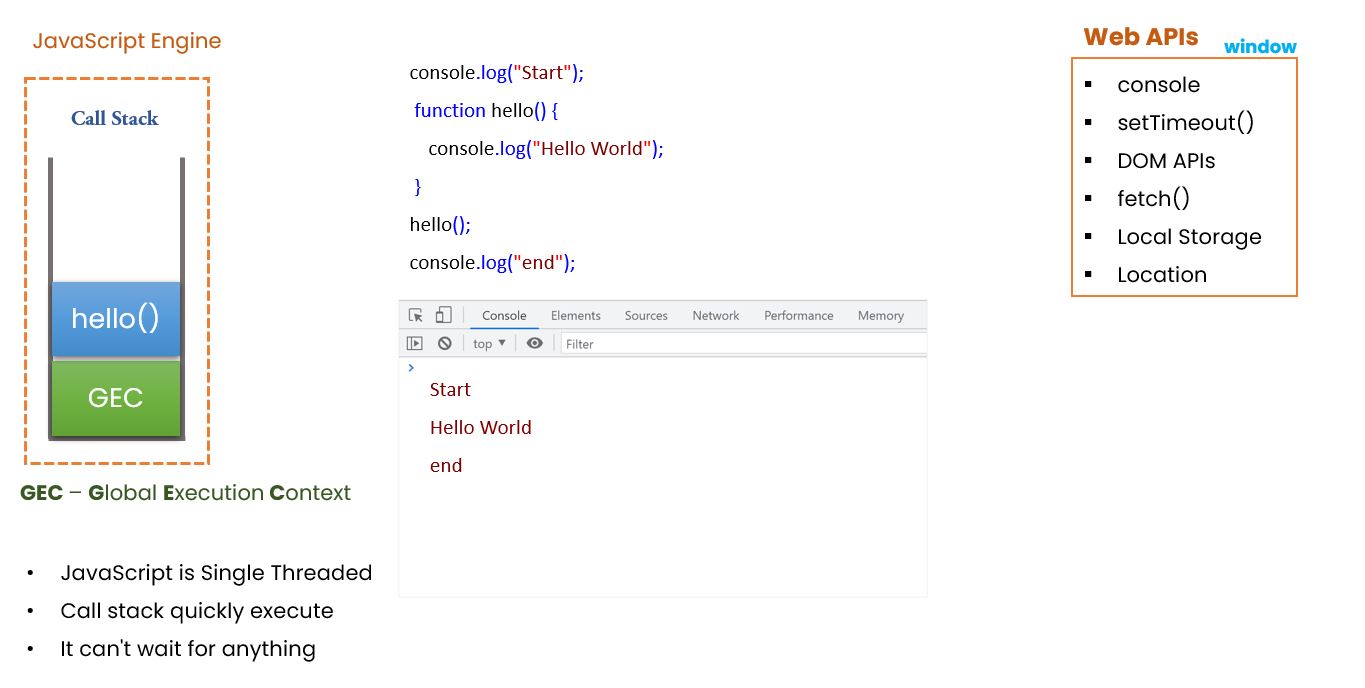
Global Execution Context
The global execution context is a fundamental concept in JavaScript that represents the environment in which the global JavaScript code is executed. It is created automatically when a JavaScript program starts running and serves as the initial context for executing the code.
Here are some key points to understand about the global execution context:
- Creation: When a JavaScript program begins execution, the global execution context is created. It consists of two main components: the global object and the this value.
- Global Object: The global object serves as the global scope in JavaScript. In a web browser environment, the global object is typically the window object. It provides access to various properties and methods that are available globally, such as console, setTimeout, Math, and more.
- Global Scope: The global execution context establishes the global scope, which is the outermost scope in JavaScript. Variables and functions declared outside of any function are placed in the global scope and can be accessed from anywhere within the code.
- this Value: The this value in the global execution context refers to the global object. In a web browser, this inside the global context points to the window object.
- Hoisting: During the creation of the global execution context, JavaScript hoists variable declarations and function declarations to the top of their respective scopes. This means that regardless of where variables and functions are declared in the code, they are conceptually moved to the top of the global scope.
- Execution: Once the global execution context is created, JavaScript starts executing the code line by line, following the order of statements. As the code executes, variables are initialized, functions are registered, and executable code is run.
- Global Variables and Functions: Variables and functions declared in the global scope are accessible from any part of the codebase, including nested functions or other execution contexts.
- Global Execution Context and Function Execution Contexts: Whenever a function is invoked, a new function execution context is created and added to the execution stack. These function execution contexts have their own variable environments and are nested within the global execution context.
Understanding the global execution context is crucial for comprehending how JavaScript manages variables, functions, and scope throughout the code execution process. It sets the foundation for the creation of other execution contexts and plays a vital role in scoping and variable access within a JavaScript program.
Web APIs (Application Programming Interfaces)
Web APIs (Application Programming Interfaces) are sets of rules and protocols provided by web browsers to enable web developers to interact with various web browser features and functionality. These APIs allow developers to access and manipulate web browser capabilities, interact with web content, handle events, perform network requests, store and retrieve data, and much more. Web APIs provide a way for web applications to interact with the underlying browser environment and extend the capabilities of web development.
setTimeout Function
In JavaScript, the setTimeout() function is a built-in method that allows you to schedule the execution of a function or the evaluation of an expression after a specified delay. It is commonly used for adding delays, creating timed animations, implementing timeouts, or executing code asynchronously.
The syntax for the setTimeout() function is as follows:
setTimeout(callback, delay, param1, param2, ...)
Here's a breakdown of the different parts of the setTimeout() function:
- callback: This parameter represents the function or the code to be executed after the delay. It can be provided as a function reference or an inline function declaration.
- delay: This parameter specifies the time delay (in milliseconds) before the execution of the callback function. It indicates how long the JavaScript engine should wait before invoking the callback.
- param1, param2, ...: These optional parameters allow you to pass additional arguments to the callback function if needed. They are passed as arguments to the callback when it is executed.
When setTimeout() is called, it initiates a timer that counts down the specified delay. Once the delay has elapsed, the JavaScript engine places the callback function in the event queue, making it ready for execution. The execution of the callback occurs when the call stack is empty and the event loop checks the event queue.
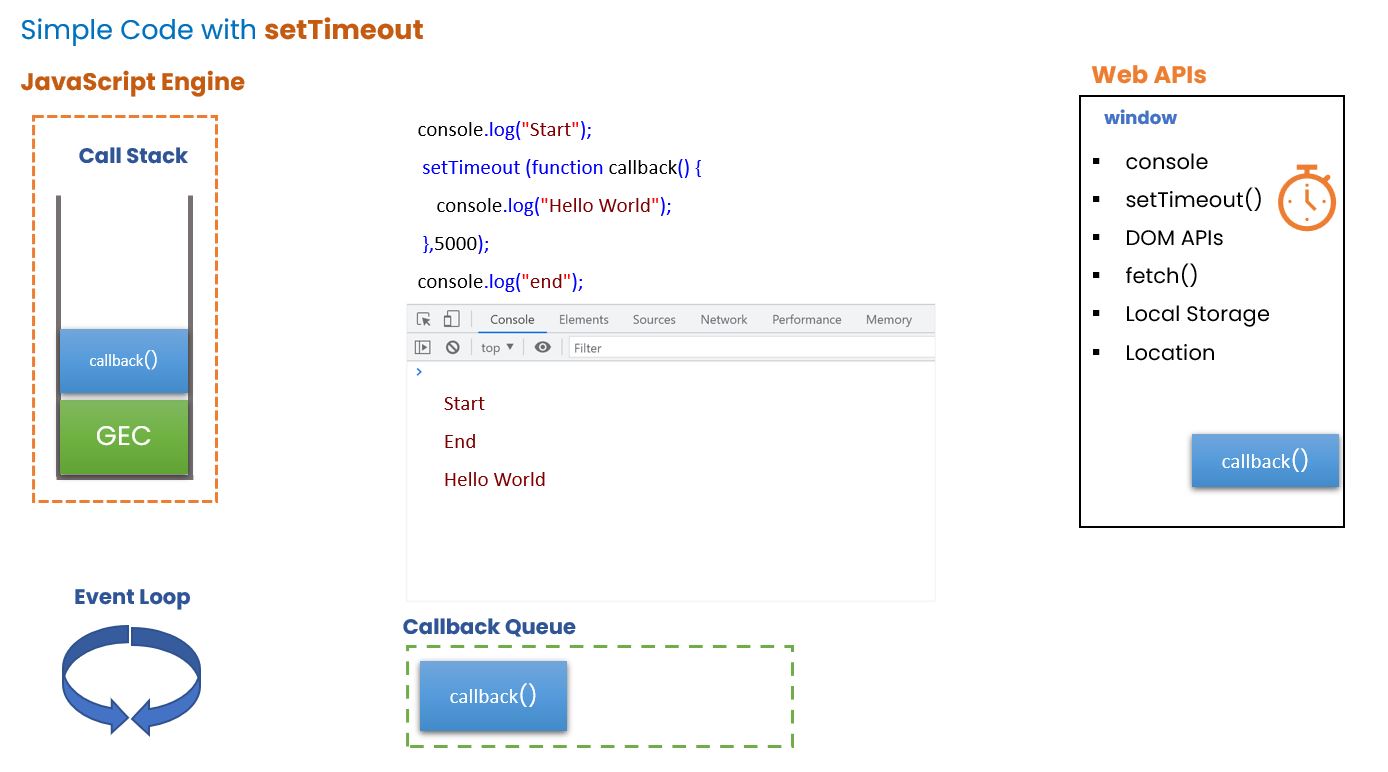
Here's an example that demonstrates the usage of setTimeout():
console.log("Start");
 setTimeout (function callback() {
    console.log("Hello World");
 },5000);
console.log("end");
The setTimeout() function is called with two parameters:
- The first parameter is an anonymous callback function: function callback() { console.log("Hello World"); }. This function will be executed after a delay of 5000 milliseconds (5 seconds).
- The second parameter is the delay specified in milliseconds (5000 in this case).
The important thing to note here is that even though the setTimeout() function is called before the console.log("end"); statement, the callback function inside setTimeout() is not executed immediately. Instead, it is scheduled to run after the specified delay. In the meantime, the code continues executing without waiting for the delay to complete. This behavior is what allows asynchronous execution in JavaScript.
So, the output shows that "Hello World" is printed after the delay of 5 seconds, following the "Start" and "end" messages.
The setTimeout() function is a powerful tool for managing delays and executing code asynchronously in JavaScript. It provides a way to introduce time-based behavior into your applications and perform actions after a specific duration.
addEventListener Function
In JavaScript, the addEventListener() method is used to attach an event listener to an HTML element or an object. It allows you to listen for specific events and execute a callback function when those events occur. The addEventListener() method provides a way to handle various user interactions and respond to events in a flexible and modular manner.
The syntax for addEventListener() is as follows:
element.addEventListener(event, callback, options);
Here's an explanation of the different parts of the addEventListener() method:
- element: This is a reference to the HTML element or object to which you want to attach the event listener.
- event: The event parameter represents the name of the event you want to listen for. It can be a built-in event such as "click," "mouseover," "keydown," or a custom event.
- callback: The callback function is the function that will be executed when the specified event occurs. It can be an anonymous function or a named function.
- options (optional): The options parameter is an optional object that specifies additional options for the event listener, such as capturing or once behaviour. It is an object with properties like capture and once.
When an event occurs on the specified element, the callback function associated with the event listener is invoked. The callback function typically takes an event object as a parameter, which contains information about the event, such as the event type, target element, and other related data.
Here's an example that demonstrates the usage of addEventListener() :
console.log("Start");
document.getElementById("btn")
.addEventListener("click",function callback() {
    console.log("Hello World");
 });
console.log("end");
The event listener is defined as an anonymous callback function: function callback() { console.log("Hello World"); }. This function will be executed when the "click" event occurs on the specified element.
The code demonstrates how to attach an event listener to an HTML element using addEventListener(). In this case, it attaches a "click" event listener to an element with the id "btn". However, without an actual click event occurring on that element, the callback function is not executed.
If you want to see the "Hello World" message being printed, ensure that there is an HTML element with the id "btn" and simulate a click event on that element. For example, you can add an HTML button with id="btn" and manually click on it to trigger the event listener.
By utilizing addEventListener(), you can create interactive and responsive web applications by handling user interactions and other events effectively.
Micro Task Queue
In JavaScript, the Micro Task Queue, also known as the Job Queue or Promise Jobs, is a component of the JavaScript event loop that handles the execution of micro tasks. It is a queue that holds tasks that are scheduled to run after the current task but before the rendering of the UI.
Micro tasks are a category of tasks that have higher priority and are executed asynchronously. They include tasks such as Promise callbacks (then, catch, finally), MutationObserver callbacks, and some parts of the ECMAScript specification, like process.nextTick in Node.js.
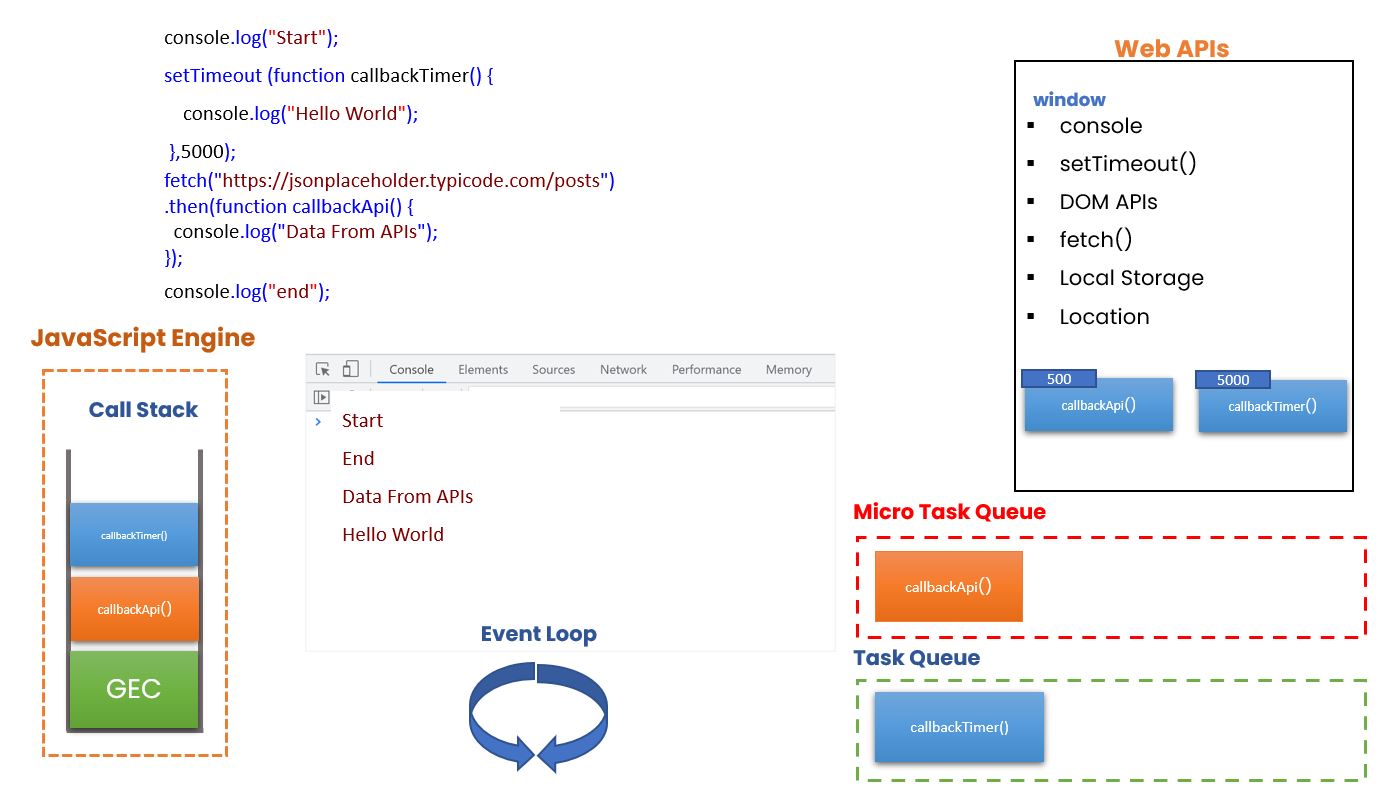
- When a micro task is scheduled for execution, it is added to the Micro Task Queue.
- After the current task in the call stack completes, the JavaScript event loop checks if there are any tasks in the Micro Task Queue.
- If the Micro Task Queue is not empty, the event loop starts executing the tasks one by one, in the order they were added. Each task is run to completion before moving on to the next task.
- While executing the micro tasks, the event loop does not perform any rendering updates. This means that micro tasks can delay rendering and other visual updates on the page.
- After all the micro tasks are completed, the event loop checks if there are any pending rendering updates or other tasks in the task queue. If there are, it proceeds to execute the next task in the Task Queue.
- This process of alternating between the Micro Task Queue and the Task Queue continues as long as there are tasks to execute.
The Micro Task Queue has a higher priority compared to the Task Queue, which contains tasks such as event callbacks (e.g., setTimeout, setInterval) and I/O operations. The event loop ensures that micro tasks are executed immediately after the current task, allowing for more fine-grained control over asynchronous operations and better responsiveness in certain scenarios.
In summary, the Micro Task Queue is a specialized queue in the JavaScript event loop that handles the execution of micro tasks. It ensures the asynchronous execution of tasks with higher priority, such as Promise callbacks, before other tasks and rendering updates take place.
List of Programs
JavaScript Arrays & Methods Examples
JS Practical Project
Learn All in Tamil © Designed & Developed By Tutor Joes | Privacy Policy | Terms & Conditions